Web-IDE: User Guide
ZOAPIIO Overview
is a one-of-a-kind on-line build-and-host development environment.
's unique Web based Development Environment (Web-IDE) takes the task of building server Web-APIs out of traditional boundaries and puts it in the hands of everyday users. If you have a good understanding of your business requirements, and a basic exposure to XML, JSON and concepts of programming logic, you can build, deploy and use Web-services (or APIs) in . Introductory and refresher public resources on programming concepts and XML/JSON are freely available on the Internet.
has several use cases and can be used in different configurations depending upon the requirements.
- Web-API is the most basic use case. Every solution that gets built and run in will use the Web-APIs.
- Another prominent use case is the end-to-end Business ERP Applications, which strongly leverages code generation. Application Wizard generates for you, the complete application from a single high-level configuration file.
- Finally, you can build full-scale consumer facing Web and Mobile applications, with multi-fold productivity and time-to-market gains.
Unboxing - First look
If you are just getting started and have not already seen this video, we suggest you view it now.
Web-IDE is targeted to non-experts, and this guide is presented with that in mind. If you have prior programming experience, you may skim over some sections.
Introduction to Web-APIs
Hello, World!
A great way to get familiar with a new environment is to learn by example. That is why every introduction to a programming environment starts with a "Hello, World!" example. While we do not have an exact equivalent here, Web-IDE provides built-in sample applications that help you ramp up quickly. We recommend that you use the information presented here with the sample applications and learn by example.
You can sign-up for a free on-line instance on ZOAPIIO.COM and get started right away.
What is Web-API
API stands for "Application Program Interface" and its basic purpose is to allow two modules within an application to interact with each other - like a telephone call does for two individuals. One application initiates the call to another through the API, and data is exchanged. The data exchange could be one-way or two-way. To illustrate using an example, the payroll module of your ERP may need information on the number of days an employee attended office, information that is available with the HR module. A simple API between the two would enable the payroll application to compute each month's payroll without any human intervention.
A Web-API (also known as Web-service) is similar, except that it allows two entirely different applications, possibly owned by two completely different parties, to interact using the Internet as the medium. The data is exchanged both ways and format used to package the exchanged data is usually XML or JSON. As you are probably already guessing right now, security plays an important role in Web-APIs because the medium is a public medium.
Web-APIs have an advantage over conventional APIs in that the communicating applications need not be based on a common technology, environment, or programming language. If each supports the HTTP protocol, they can communicate. This advantage has led to its fast acceptance - architects now prefer to use Web-APIs even to communicate within an application, even though they share the same technology. This keeps the integration open and future-proof. It is also for this reason that the Web-APIs and Web-Services are now simply referred to as the APIs.
| Message Format | API Request (Client) | Response (Provider) |
|---|---|---|
| XML | <GetTemperature> <Country>UK<∕Country> <City>London<∕City> <∕GetTemperature> |
<Temperature> <Country>UK<∕Country> <City>London<∕City> <Unit>Centigrade<∕Unit> <Temperature>24.5<∕Temperature> <DateTime>2019-01-01 11:00:05<∕DateTime> <∕Temperature> |
| JSON | { "Country": "UK", "City": "London" } |
{ "Country": "UK", "City": "London", "Unit": "Centigrade", "Temperature": "24.5", "DateTime": "2019-01-01 11:00:05" } |
| Web-API illustration for a public (open) weather service. | ||
For request and response messages, the format and content (fields and structure) is fixed and each party knows what to expect and what each field means. XML and JSON formats allow the request/response messages to be human readable and hence easy to understand. If you are a provider of an API, you are free to decide the structure of the message and then share it with the API clients. If you are consuming services provided by others, then you need to know the structure published by them so that you can prepare and interpret the messages accordingly.
allows you to use undeclared message structures but this is highly discouraged because it keeps the Web-IDE from validating the message node references in your program. Such situations result in run-time errors which are more difficult to debug.
HTTP Transport
Web-APIs work using the HTTP transport - this means that the same HTTP protocol that you use to browse the web is also used to send and receive information in a Web-API. In fact, some Web-APIs (though not all) can be accessed from the browser itself. A Web-API is a resource on the web, like a webpage. It has an endpoint (or entry point) which is identified by a URL - quite like the URL that you type in your browser to reach a webpage.
Web-APIs will typically be invoked from another application or program - but for the purpose of testing, you will need a mechanism to invoke them from a test environment. Some Web-APIs can be directly called by typing their URL in your favorite browser. For others, you will require a desktop tool which allows greater control on how the APIs are called. A popular tool that lets you do this is 'Postman' - it is recommended that you install this on your desktop because you will need it to test your Web-APIs. Another similar tool is SoapUI, which also supports SOAP - if you plan to build SOAP services, then you should install SoapUI.
HTTP requests most commonly use a GET or a POST method (although other methods are also there) for communication. A GET request can carry information forward only as a part of the URL, which is difficult to read and has size limitations - it is useful when the outgoing message is small and simple. The POST request can carry arbitrary sized data which is sent separately from the URL and is preferred when the outgoing data is large or complex. Both GET and POST can receive data of any size and in any format - typically, HTML, XML or JSON.
MQ Transport
A lesser used but still useful way to communicate over the web is the Message Queue transport. HTTP communication is synchronous - means that the data is exchanged within the same unit of transaction. A message sent using the Message Queue, on the other hand, is not processed immediately but queued for later processing. The Client does not receive the response of the message handling. MQ transport is useful when the communication is mostly one-way, and the traffic is high - implying that the requirement of an immediate response will create a high-load situation on the servers. A class of applications that make heavy use of MQ transport is in the field of IOT. Typically, the number of devices is quite large in the network and each device is mostly engaged in one-way communication of reporting its status to the application.
| Transport | Seq | Client (Requestor) | Communication | Server (Provider) |
|---|---|---|---|---|
| HTTP | 1 | Send Request | ||
| 2 | Process request and reply | |||
| 3 | Receive Response | |||
| MQ | 1 | Send Request | ||
| 2 | Store request and acknowledge | |||
| 3 | Receive Acknowledgment (no response) | |||
| 4 | Process request later | |||
| Web-API transport comparison. | ||||
SOAP Protocol
SOAP is another protocol for using Web-APIs that is also based on HTTP but has some differences in the way it works. You can look-up the details of the SOAP protocol on the Web if you are interested, but SOAP is losing popularity, and we advise you to use HTTP services for your application. However, it is possible that you may still need to deal with SOAP because a service that you need to consume from another provider uses SOAP protocol.
Web-Socket
Web-Socket is a special purpose communication protocol used in high-traffic situations. A conventional Socket in programming represents a permanent two-way channel between two communication parties. The communication is not transactional, but data is continuously transmitted in both directions. Since the connection is permanent (for the life of the socket), no time is wasted in establishing the connection with every message.
A Web-Socket is an adaptation of Socket functionality over HTTP and provides similar capability that Sockets do. Web-Sockets generally do not figure in business applications and the chances of you requiring them are low. However, allows you to build Web-Socket services.
GraphQL
GraphQL is another convenience construct used in client-server communication over the web. It also uses the HTTP GET/POST as underlying transport mechanism, but the messages have a certain structure that carries operational instructions to the server along with the data. The most common GraphQL feature is the ability to specify the fields that should be returned in the response.
GraphQL is gaining popularity but developing GraphQL server is much more complex than classical HTTP REST APIs. Fortunately, allows you to write GraphQL services with utmost simplicity. It is still an advanced subject, and most projects are based on HTTP/REST services. Should you require GraphQL for your project, ZOAPIIO has full support.
ZOAPIIO Programming Model
Your Instance consists of
- A runtime, or the application container - this is where your programs are stored and executed, and all the other magic happens. runtime is a Java application running under a Java Web-Server, such as Tomcat.
- A web-based development environment consisting of
Web-IDE and supporting tools. All the development tools are web-based,
which means that you never have to install anything on your desktop or use any
third-party services or tools.
- The WebIDE designer, where you design and develop the apps. Also, all other supporting tools are launched from here. The Application Wizard is a part of the designer.
- The DB Assistant, from where you can manage your relational databases - like create tables, browse/update data etc.
- A Debugger - no IDE is complete without a debugger. The services running on the server can be debugged using the web debugger.
- A trace log viewer. Sometimes, the execution trace log inspection can reveal errors faster than executing under the debugger. You can view the execution trace to spot errors quickly and easily.
Your Programs (server) are-
- Composed of Web Services - almost all API types are supported (See the Introduction above).
- Written using a high-level abstraction language allowing you to write the business logic without concerning with underlying Java programming constructs.
- Parts of your application can be written in Java programming language. This is useful, at times essential, in managing complex computational tasks.
- The data schema declares the structures of communication messages, database storage, and transient storage.
- The programs are saved in a proprietary format (XML format).
- Basic version control is applied to your project file.
The schematic below provides an overview of the components in a ecosystem. The Application container is fully managed and is hosted on the cloud.

| Visual representation of the runtime and developer tools. |
Abstraction
The proprietary abstraction language (4GL) is very compact and powerful. leverages the power of XML (hierarchical structures) and abstracts all entities in your development environment as XML nodes. This means that you access all elements of your programming environment as if they were a part of one large XML document. For instance, a database table appears as a node in your project Schema - takes the responsibility of mapping the node to the underlying entity, the database table in this case. Same is true of all entities in the system. You, as API developer, do not have to be concerned with technical internals like where the database is located and how the data is retrieved and updated.
The abstraction principle used by , greatly simplifies your programming experience and sharply reduces the learning curve. It is also responsible for a large part of the productivity gains.
Logic Builder
- To add a command, or a data element (expressions, constants and Data paths) select from the menu on the left and then drop it on the program block.
- An item (commands, data elements) can be attached to an appropriate point in the program block using its connector.
- The Web-IDE will not allow you to connect a selected item where it does not belong.
- To remove an item from the program block, simply drag it into the recycle bin (at the bottom right corner).
- You can move items in the program block by dragging them out or their present position to a new position.
- You can drag an item from the data schema window and attach it at a point that expects a Data path.
- You can edit the values inside items, or choose from the provided drop-down, where appropriate.
- As you type the Data paths and expressions in the program block, Web-IDE will validate them and flag errors if any.
- The right-click on an item in the program block will show you the context menu, from where you can access utility functions like enable/disable, duplicate, etc.
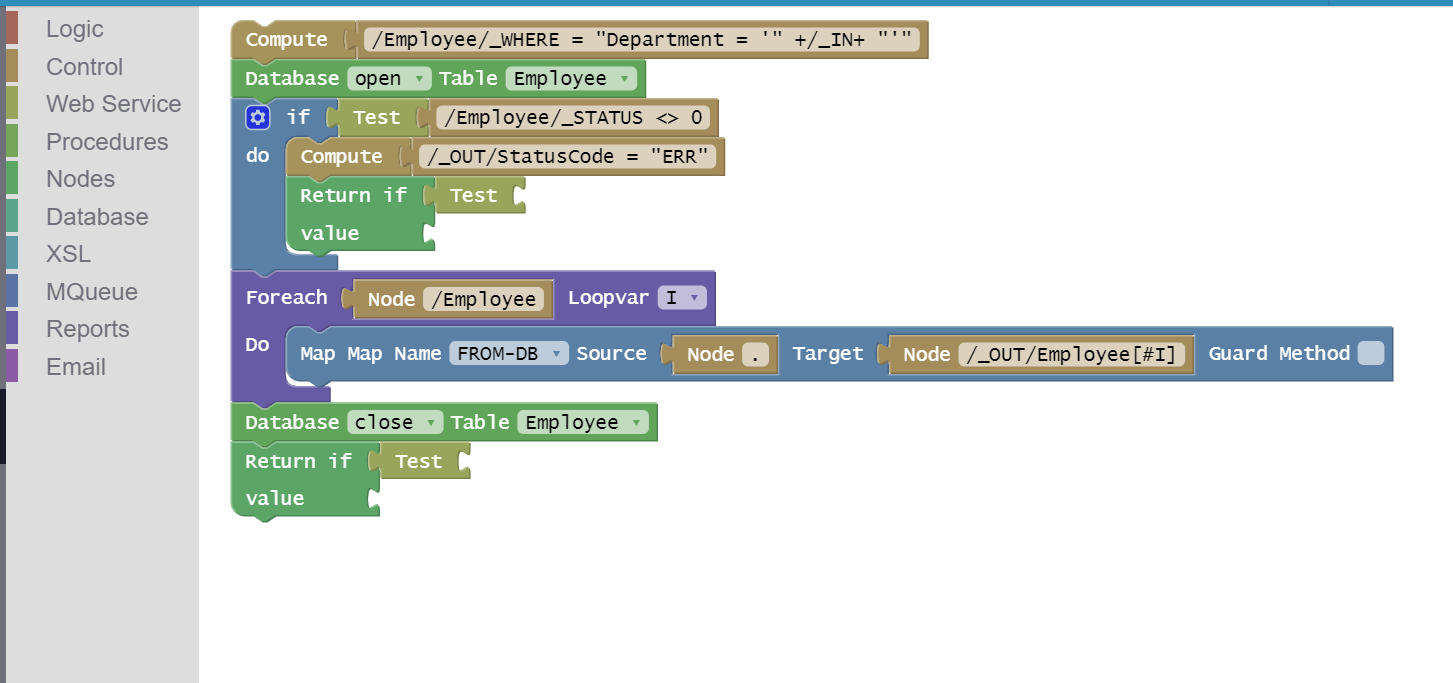
| A simple program in Web-IDE. |
Schema
Recall your first programming course, where you learnt that a computer program is data+logic - don't worry if you never went to a programming school, you've learnt it now. In most environments, the data elements that your program would use are declared beforehand and a datatype is attributed to it so that computational operations on it can be validated and appropriately handled.
In your data elements are hierarchical structures in direct correspondence with the structure of the Web-API messages which are also hierarchical. The data elements are declared in the Schema - the left panel in your Web-IDE window. As you should expect, much of your schema will be composed of the messages that you exchange with clients and other services. Additionally, you will have some working data structures that are used to store intermediate results and temporary data.
Reusable Structure Declarations
Many messages in a Web-API have the same structure, and it is only natural that they are declared only once and then used multiple times. Otherwise, your schema can become very complex and large - not to mention, a nightmare to maintain. provides the TYPES node in the schema for this purpose. The contents under the TYPES node have the same declarative format, but do not have any storage associated with them. They must be referenced in the Data Schema before they can be used.
Data Schema
You will declare data element structures to be used by your Web-APIs directly under the Schema, or you can organize them as sub-nodes under a root level group. This helps keep large projects manageable and easy to read. In , you will declare your working data elements under the VARIABLES node - they can be hierarchical structures just like everything else. Using VARIABLES node to declare your working data is not strictly a requirement most of the time, and you can declare them anywhere. Except when writing the logic for your Web-APIs, some index references are required to be under the VARIABLES node. For clarity, it is recommended to keep your working data separate under VARIABLES.
Your session variables (again, can be hierarchical) are declared under the SESSION node. See Application Session
The Schema will also contain all abstracted entities in the system, which, as explained above, appear as XML nodes. Some of the entities abstracted in are-
| Element | Description |
|---|---|
| DATABASE-TABLE | A database table with support for DB read/update operations. |
| DATABASE-QUERY | A database query (query and updates) to handle complex database interactions. |
| MONGO-COLLECTION | A MongoDB collection. |
| SESSION | Abstraction for the application session. See Application Session. |
| REQUEST | Abstraction for the HTTP Request. When the Web-API is entered, the caller can pass parameters to it as standalone values or through complex XML/JSON structures. The REQUEST node will allow your Web-API to access the input that was passed to it. |
| COOKIES | Abstraction for the HTTP Cookies. You can access the cookies in the input request and set Cookies in the output using this node. |
| PROPERTY-SET | Abstraction for the application properties. An application typically has some fixed settings, which can be changed from outside without the need to recompile the application. This node provides read-only access to your application properties. The properties are stored in a database table. You can view and update them using the DB Assistant. |
| EMAIL-SENDER | Abstraction of an SMTP server for sending email messages. |
Programming
The data in your project needs to be processed - you provide Web-APIs for this purpose and write the processing logic (or the program) against these. In line with 's abstraction approach, the processing details are also captured as a part of the project Schema. The "Business Flows" node in the schema is used for the purpose of declaring, among other things, the Web-APIs that you provide.
The building of programs, or programming, has traditionally been a complex task meant for experts. To make matters worse, this complexity has grown over time with the introduction of frameworks, such as Spring, as it dramatically raises the entry level skill requirements for your programmers.
The algorithm
An algorithm is like a recipe that contains step-by-step instructions on how to start from raw input (ingredients) and arrive at the output (the finished dish). Think of branching and iterations like you would find in a recipe. E.g., "if gas oven, pre-heat for 10 mins, else if electric oven, pre-heat for 20 mins" (condition), or "stir gently until light brown" (iteration).
A conditional statement ( If statement) contains a condition and a block of statements. If the condition evaluates to true, the associated block is executed, otherwise the execution continues with the statement following the IF statement. A variant of the basic IF is the multiple branching statement (IF... ELSE IF.... ELSE...), where multiple conditions and multiple blocks are present. Depending on which condition is true, the corresponding block is executed.
In multiple IF statement, maximum one block will be executed, but none might be executed (if no condition was satisfied). Generally, the last sub-IF block in the IF statement is left without a condition, which means that if no other condition was met, the last block would be executed.
An iterative statement ( ForEach and While statements) is also associated with a condition and a block of statements. The given block of statements is executed repeatedly as long as the condition holds true. The condition is evaluated before every iteration. The block associated with the iteration should eventually do something to make the condition become false, otherwise the program will keep on iterating forever (called an infinite loop).
In a program, the conditional and iterative statements can be nested within themselves or each other up to an arbitrary level. This means that statement block associated with each control statement can contain other control statements. Most typical algorithms would require you to use this nesting very frequently.
Tip: There are many ways to write the same algorithm and a good program is one that is compact and easy to understand. It is advised that before you jump into the Web-IDE to start writing the program, spend some time with pen and paper to sort out the logic clearly.
For your programs, under the "Business Flows" node in schema, you declare the following-
| Element | Description |
|---|---|
| DECLARATIONS | This is for advanced use only and applicable only when you are embedding Java modules in your project. Most of the time you are better off leaving this alone. Internally, your project is deployed inside a Java container, and this contains a wrapper declaration of the Java class that will hold your project. If you need to import Java classes or use Java functions that should be available throughout the project, you will declare them here. Another time you need to edit this is if you want to create background jobs in your project. See Background Jobs. |
| WEB-SERVICE | A Web-API or service (SOAP or REST), that your project will consume. Please note that there are no MQ services, and to send a request to an MQ server, you will use MQ-DESTINATION. |
| ENTRY-POINT | A REST endpoint (HTTP GET, POST etc.) that your project will provide. |
| ENTRY-POINT-SOAP | A SOAP service endpoint that your project will provide. |
| ENTRY-POINT-JMS | Processor for a Message Queue that your project is serving. |
| ENTRY-POINT-GRAPHQL | Processor for a GraphQL service. |
| ENTRY-POINT-WEBSOCKET | Processor for a Web-Socket service. |
| ENTRY-POINT-EMAIL | Processor for automatically polling an Email account and handling messages. Please see Using Java below on discussion on how to gain access to the incoming message. |
| ENTRY-POINT-PROCLET | A Proclet is a construct representing a business process. It is hosted on a URL like an ENTRY-POINT, but it is accessible only internally within your instance. Different projects hosted in the same instance can access the proclets. |
| ROUTINE | Also called subroutine, a routine is a programming construct that lets you build your program by combining smaller, more manageable, and reusable pieces of logic. Before your start writing it, you should analyze your business process (design) and break-up the process into smaller self-contained sub-processes and build them as ROUTINEs. |
| METHOD | An isolated and independent part of processing like the ROUTINE, except it is written using the Java programming language. This is also for advanced use and if you must use a METHOD and do not know Java programming you should take help from someone in your team. |
| MQ-DESTINATION | A Message Queue to which, your project will send messages. The Queue may be attached to a process within your own project, a different project or to a third-party service, external to your instance. |
| XSLT | XML Stylesheet Transformation (XSLT) is a popular programming tool to process XML (hierarchical) structures. Given that abstraction is based on XML, this feature can be useful and is available to advanced users. In a real-life situation, the only time you will need this is if you have an existing XSLT script that you want to reuse in your project. |
| XML-STUB | A hard-coded XML structure in your project. Sometimes you need to initialize a large structure with fixed values - an XML-STUB provides a very fast mechanism to achieve that. |
| WEB-SCRAPER | A node representing an external HTML source (website) for interfacing through scraping. The web-scraping statements in your programs will use this. |
Data Paths
In Web-IDE, you will refer to data elements using the Data Paths. Data Path is a powerful abstraction that hides the complex processing details, which a programmer must deal with in a conventional development environment. Depending upon the underlying entity that a schema node is abstracting, will deal with it accordingly. It should be pointed out here for advanced users that the Data Path is syntactically not same as the XPATH, although it is similar.
It is important to note that the schema in the Web-IDE is only a declaration, and not everything in it will contain actual data. When your Web-API executes, the data schema is populated as the processing continues. At the start, the contents of the REQUEST (or the alternative that you have declared with your Web-API definition) is populated from the incoming request. In the case of SOAP service, the input is populated from the SOAP request. The contents of the SESSION are also fetched.
Other parts of the schema will be populated inside your processing logic. You can freely read or change the contents of the data at runtime. Before your Web-API finishes execution, you should - at the very least - put values in the part of the data tree that comprises of the response (defined with the Web-API declaration). takes care of returning the data to the caller in the appropriate format using the right protocol.
Data Paths look like the file pathnames in your Windows (or Linux) OS. In XML the forward slash (/) is used as the path separator and it separates the name of the elements in your schema, quite like your folder path. Starting from the root node (like the root folder in your file system) you can traverse to any node in the XML data tree, by naming the next element name and separating it with the slash.
Similarity with the file pathnames continues as the Data Paths also have an absolute pathname and a relative pathname. Like you have a default (or the current folder) in your file explorer, inside your program there is the concept of a context path. If there is a context path, then you can use a relative Data Path (I.e., not starting with a slash) and start traversal from the context path.
Indexes and Keys
It is permissible and quite common to have multiple instances of an element in the data tree. An example case would be if you are passing a list of, say, Employees all having the same data structure. In schema you will declare such elements with the attribute "Duplicates" checked.
You need a mechanism to individually access such items - offers two methods to address each individual item in the list - Indexes and Keys. The index appears in square brackets [] and immediately follows the element name. E.g., Employee[10] would refer to the 10th Employee node in the tree. Note that the indexes start from 1 (unlike most programming languages, where indexes start at 0) and if no index is provided, it defaults to the first.
Inside the program you can also use a variable for the index. If you have an element declared under VARIABLES (or _LOCALS - See Declare statement) node of type NUMBER, then you can use that as a variable index. When using a variable index its name should be prefixed with a "#". E.g., Employee[#I] refers to the "I"th Employee where I is the value stored in the node /_LOCALS/I or /VARIABLES/I - searched in that order.
The index value zero (0) is used for a specific purpose. It always points to a new element at the end of the existing list of nodes. Be careful, when using the zero index in a path - every time the path is evaluated, a new element would be created.
To use Keys, the element that is a list should be a group Element and at least one of the elements inside it should be declared as a key ('Is Key' attribute should be checked). The key of each Element in the list is formed by taking each key field in it and concatenating them by the bang (!) character. To access an Element by key, you will enclose it in curly braces {} and put it immediately after the Element name. E.g. Employee{M100}, would select the Employee node whose key is the string "M100". You can use variables in Keys, just like you use them in indexes, except the variable need not be a number. E.g., If Employee Id is the key for the Employee Element, Employee{#EID} would select the Employee with Employee Id 'EID', where EID is an Element under /_LOCALS or /VARIABLES - searched in that order.
AttributesAttributes are a construct used in the XML representation of data but has no equivalent in JSON. Attributes are used to specify additional information about the XML node. E.g., in XML <Employee Type="Full-Time"> Type is an attribute. It is possible to have "Type" as a sub-node of the Employee node, but attributes improve readability. E.g., the same can be achieved using <Employee><Type>Full-Time ...
In you will declare ATTRIBUTES under the TAG nodes, but if you are using JSON formats for your messages, it is better to avoid them. In the Datapath, the attributes are referenced by putting the attribute name in the end separating it from the rest of the path with an "@". E.g Employee@Type.
Web Scraper Elementsabstracts a Web Scraping data source like everything else. The elements appearing on the web page are referenced using data paths. There are some differences, however, in the treatment of Web Scraper elements.
- The structure of the HTML content in a scraper is not declared in advance - it is not possible to know up front the contents of the web source.
- In data paths for web elements, the separator (/) is interpreted differently. Normally, the sub-path must be present directly under the parent. But in case of web elements, the sub-path can appear anywhere under the tree below the parent node.
- The index for a web element can use attribute selection (See below).
- The web elements can have a second index, which acts as the index described above.
The attribute selection in Web element data paths serves to identify nodes in the HTML page by their attributes. The syntax of the index is-
{TagName}[@{AttributeName}:{AttribtueValue}]
- The index is delimited within square brackets - [].
- The attribute name is prefixed with '@'.
- Colon (
:) acts as the separator. - Attribute Value is specified, must exactly match the web element.
- Alternatively a double colon (
::) is used to indicate loose match - the given value must appear anywhere in the web element attribute. - Special attribute 'text' refers to the HTML text in the element.
| Path | Description |
|---|---|
| / | The Root node of runtime data tree. |
| /REQUEST/EmployeeId | The node by name EmployeeId under the REQUEST node under root. Because abstracts the REQUEST node to represent the Web-API HTTP Request (unless specified differently with Entry Point declaration), this would contain the value of parameter "EmployeeId" passed with the request, such as http://...../?EmployeeId=100. |
| /Response/Employee[20] | If multiple Employee nodes are present under the Response node, this path identifies the 20th Employee node. |
| /Response/Employee[0] | This will create a new Employee node at the end of existing Employee nodes under /Response and point to that. |
| /Response/Employee[20]@Type | The Type attribute of the 20th Employee under the Response node under root. |
| Employee[20]@Type | A relative pathname having the same effect as above, if /Response is the context path. |
| /Response/Employee[#I] | Another way to identify elements from an array (multiple occurrences). The value stored in /VARIABLES/I is used as the index value. |
| /Response/Employee{100} | If Employee structure is declared with a key field for EmployeeId, then this would refer to the Employee Id 100. |
| /Response/Employee{#EMPID} | Same as above but with a dynamic key value (/_LOCALS/EMPID or /VARIABLES/EMPID). |
| /GGL/div[@id:elementid] | Assuming GGL is a WEB-SCRAPER, this data path will point to the first div element in the page with id=elementid. |
| /GGL/div[@class::elementclass][3] | Assuming GGL is a WEB-SCRAPER, this data path will point to the third div element in the page with class value containing elementclass. Generally the class specification contains multiple names, so double colon (::) is used for 'contains' match. |
| /GGL/span[@text::Hello] | Assuming GGL is a WEB-SCRAPER, this data path will point to the first span element having 'Hello' anywhere in its text. |
| Examples of Data Paths used in . | |
Expressions
In , Expressions are used for manipulating the values in the data tree. This means that for almost everything that you need to do in the program, you will be needing an expression. Thankfully, expressions are simple, and you already know them. E.g., "4 + 4" is a simple expression to say that the two given numbers need to be added. The expressions are made up of operands (values participating in the computation) and operators.
In programming, you use variables to hold values - so if you have two variables I and J, then expression "I + J" would mean the values of variables I and J need to be added. The two can, of course, be mixed as in "J + 4".
Data Types
Data Types of the operands participating in an expression play an important role in how the expression is evaluated. For instance, the addition operation (+) is treated as a concatenation for string operands, and as numeric addition for numeric operands.
All programming languages need to know the data type of the operands - some expect to be explicitly declared, while others infer it implicitly. expects the Data types to be declared. When defining the TAG elements in your data schema, you specify a Data type.
| Data type | Description |
|---|---|
| STRING | The most basic and generic data type - represents a string. E.g., "The quick brown fox jumps over the lazy dog". |
| NUMBER | A whole number (or integer). E.g., 153, or 5318008. |
| DECIMAL | A fractional (or a decimal) number. E.g., 3.14. |
| DATE | A date without Time-zone. It is entered as a string in YYYY-MM-DD format. E.g., "1950-09-17" |
| DATETIME | Similar to the DATE datatype, with added time information in HH:MM:SS format. E.g., "1969-07-21 02:56:15". |
| BOOLEAN | A value evaluating to true or false. It is entered as a string and interpreted as follows. It the string can be read as an integer and is non-zero, evaluates to true, and if it cannot be converted to an integer, values "true", "yes", and "on" evaluate to true. Other values evaluate to false. |
| TYP:<Name> | This is not a Data type by itself, but it is a notation used to support reusable data structure declarations. It declares a node referencing a name under TYPES node that has the actual structure declaration. |
| REF:<Name> | This is like the TYP: declaration above but names another node within the schema itself (not under the types). This allows you to reuse the structure of another element already declared in the same schema. |
| EXT:<Name> | A variation of the TYP: declaration, where the referenced TYPE structure can be extended by declaring more elements under it. So, the effective structure of this node is the structure copied from the referenced node and the extensions added under this node. |
| Data types used in . | |
Operators
The expressions are made up of operands (values participating in the computation) and operators (the operation). All programming languages support almost the same common set of operators, as does - and some additional ones.
| Operator | Rule | Description | |
|---|---|---|---|
| = | The assignment operator. The value appearing to the right of the operator is copied to the node given on the left. Some rules apply here. | ||
| 1 | The left-hand side (LHS) of the assignment must be a Data path identifying a node in the tree. It cannot be a constant or another expression. The right-hand side (or the RHS) of the assignment can be a Data path, a constant or another expression. E.g., "/VARIABLES/I = /VARIABLES/J + 4" is a valid expression. Expressions "4 = 5" and "(/VARIABLES/I + 5) = 100" are invalid. | ||
| 2 | The data type of the LHS should be compatible to receive the value coming from the RHS. | ||
| 3 | If LHS is a STRING, it is compatible with all other Data types and before assignment the RHS is converted to string. | ||
| 4 | If LHS is a NUMBER or DECIMAL, an attempt is made to read the RHS as a NUMBER (or DECIMAL) and the resultant value is used, else a 0 is assigned. | ||
| 5 | If LHS is a DATE or DATETIME, an attempt is made to read the RHS as a date or datetime and then assigned. Otherwise, a blank is assigned. | ||
| + | The addition operator. | ||
| 1 | If both operands are numeric (NUMBER or DECIMAL), the result is the numeric addition of the numbers. | ||
| 2 | If the first operand is a STRING, the result is obtained by concatenating the two operands. E.g., '"Hello, " + 5' will result in the string "Hello, 5". | ||
| 3 | If the first operand is DATE or a DATETIME, the second operand is taken as a string and then read as a period specification (See next bullet). The result of the expression is the new date with the given period added to it. | ||
| 4 | A period specification in is a string composed of blocks each containing a number and a period specifier. E.g., "10Y 2M" means 10 years and 2 months. The period specifiers are- Y=Year, M=Month, D=day, h=hours, m=minutes, s=seconds. | ||
| - | The subtraction operator. | ||
| 1 | If both operands are numeric (NUMBER or DECIMAL), the result is the numeric difference of the numbers. | ||
| 2 | If the first operand is DATE or a DATETIME, the second operand is taken as a string and then read as a period specification (As defined above under + operator). The result of the expression is the new date with the given period subtracted from it. | ||
| 3 | This operator is invalid for all other operand combinations. | ||
| += | The add and assign combination operator. The RHS of the expression is added to the LHS and then assigned back to the LHS. | ||
| 1 | As in the assignment operator, the LHS must be a Data path. | ||
| 2 | This operator is valid only for numeric operands. It is invalid for other Data types. | ||
| -= | The subtract and assign combination operator. The RHS of the expression is subtracted from the LHS and then assigned back to the LHS. | ||
| 1 | As in the assignment operator, the LHS must be a Data path. | ||
| 2 | This operator is valid only for numeric operands. It is invalid for other Data types. | ||
| * | The numeric multiplication operator. The result is the numeric product of the two operands. | ||
| 1 | This operator is valid only for numeric operands. It is invalid for other Data types. | ||
| / | The numeric division operator. The result is the numeric division of the two operands - first operand divided by the second. | ||
| 1 | This operator is valid only for numeric operands. It is invalid for other Data types. | ||
| % | The mod or the remainder operator. The result is the value which is left as remainder when first operand is divided by the first. E.g., "7 % 5" will evaluate to 2. It is always between zero (inclusive) and the second operand (exclusive). | ||
| 1 | This operator is valid only for INTEGER (whole number) operands. It is invalid for other Data types. | ||
| ~ | The pattern match operator. The second operand is treated as a regular expression and matched against the first operand. Any resultant matching string is the result. If you have no prior knowledge of regular expressions, you can read up on it or take help from a programmer in your team. | ||
| 1 | Both operands are string types and all other Data types are automatically converted to strings before evaluation. there is no Data type restriction. | ||
| 2 | The second operand should be a valid regular expression, otherwise the result is a blank string. | ||
| ~~ | Match closeness operator. The result of this operator is a number between 0 and 100 suggesting how closely the strings resemble each other. | ||
| 1 | Both operands are string types and all other Data types are automatically converted to strings before evaluation. there is no Data type restriction. | ||
| == < > <= >= <> | Comparison operators - equals, less that, greater than, less or equal, greater or equal, and not equal - respectively. The result is a Boolean value (true/false), comparisons are typically used in expressions used as conditions in "If" programming statement. | ||
| 1 | All these operators work on similar Data type rules and work differently for different operand types. | ||
| 2 | If both operands are strings, the operands are compared as strings, i.e., as per alphabetical ordering. The second operand is converted to string if necessary. So, "1" is greater than "09" | ||
| 3 | If any of the operands is a date, an attempt is made to convert the other operand to a date and then the operands are compared as dates, i.e., as per calendar ordering. | ||
| 4 | If any of the operands is numeric (INTEGER or DECIMAL), an attempt is made to convert the other operand to a number and then the operands are compared as numbers, i.e., as per value ordering. So, 1 is greater than "09" (converted to 9 as number). | ||
| 5 | If a Data type conversion is attempted and it fails, the evaluation of the expression is aborted immediately | ||
| && | The logical "and" operator. It expects each of its operands to be a Boolean value and the result is true if both the operands are true. | ||
| || | The logical "or" operator. It expects each of its operands to be a Boolean value and the result is true if any one of the operands is true. | ||
| 1 | It is important to note that in most programming languages, if the first operand is false in a logical "or" evaluation, the second operand is not evaluated at all. In , both operands (if they are sub-expressions) are evaluated even if the first one is false and there is no need to evaluate the second operand because the result of the evaluation does not depend on it. It may sound like a trivial detail but becomes important if the second sub-expression has side-effects like changing some value in the Data tree. | ||
| , | The pass-through operator. This operator does not do anything, and the result is simply the value of the second operand. It is generally used to write multiple assignments in a single expression for compact code. E.g., "A = B, X = 5" will make two independent assignments. | ||
| Operators used in expressions. | |||
Precedence
The expressions that you will typically write will be more complex than the simple expressions discussed so far. Even the most basic computation like addition will have two operators - one for computation and the other for assignment. More complex expressions will have even more. E.g., an expression like "A = B + C - 5". It has three operators in it. That is why you need to understand operator precedence.
Precedence decides in which order the operators are evaluated. Expression "A = B + 5" does not end up assigning B to A and then adding 5 to the result. This is because the assignment (=) has a lower precedence than the addition (+). The higher precedence operator is evaluated first, and that is why the result of adding B and 5 is assigned to A in this case. Within operators of same precedence, the evaluation is performed from left to right. As another example, expression "A = B + C * 5" will evaluate "C*5" first then add "B" to it and assign the result to A.
The operator groups in order or precedence from highest to lowest are-
- * / %
- + - ~ ~~
- == < > <= >= <>
- &&
- ||
- = += -=
- ,
If you have an expression that requires an order of evaluation different from the natural order, you can use parentheses to force an evaluation order. The content inside the parentheses is evaluated first, irrespective of the precedence of the operators. For instance by putting parentheses around "B + C" in the example above- "A = ( B + C ) * 5", the evaluation order is changed to evaluate "B + C" first. Parenthesized sub-expressions can be nested to create more complex expressions.
Pseudo Elementsadds certain attributes and data elements in the runtime Data tree in line with its abstraction approach. These pseudo attributes and elements are mainly used for easier access to some functions and to communicate information back to your programs. For example, when you execute a database operation, how do you know if the operation encountered an error. reports the status of the database operation through a Pseudo element (_STATUS) under the Table node. E.g., /Employee/_STATUS would contain the status of the last database operation on the table "Employee".
The names of all pseudo attributes and elements begin with an underscore (_), so it is advised that you do not use names in your schema that start with an underscore. The following is the complete list-
| Pseudo Element | Applies To | Description (@.. are attributes). |
|---|---|---|
| /_LOCALS | Inside Routine code | This points to the local TAG declarations within the routine. |
| /_TODAY | /VARIABLES | The current date. I.e., the Data path /VARIABLES/_TODAY can be used to access the current date. |
| /_NOW | /VARIABLES | The current time. |
| /_HOSTNAME | /VARIABLES | The name of the server where your Web-API is executing. |
| /_HOSTIP | /VARIABLES | The IP address of the server where your Web-API is executing. |
| /_CLIENTIP | /VARIABLES | The IP address of the client from where your Web-API was invoked. |
| /_CLIENTISO | /VARIABLES | The 2-character code of the country from where your Web-API was invoked. |
| /_INSTANCE | /VARIABLES | A unique (sequential running number) for the current instance of this Web-API. |
| @_BASEURL | /REQUEST | The base URL of the server - it should be same as your Instance URL. |
| @_OAUTH | /REQUEST | The username of the user authenticated by OAuth. If the request had a valid authorization token, the corresponding username is passed here, otherwise it is blank. Please note that this value is set whether or not OAuth check is enabled for the service. This allows the service to implement its own security in conjunction with the OAuth mechanism. _OAUTH is also set if Oauth username and password are received with the request in the "Basic" header configuration. This allows a direct call to the service without performing an explicit authentication beforehand. |
| @_SERVER | /REQUEST | The Server name used while sending the request. The way HTTP DNS can be configured and with the use of HTTP forwarding, this can be different from "my.zoapiio.com" |
| @_PORT | /REQUEST | The HTTP Port on which the request was sent - it should typically be 443, the default for HTTPS. |
| @_PATH0 | /REQUEST | This would be same as the Web-API Entry point URL in your project. |
| @_PATH1, 2 .. | /REQUEST | When a request is received by server, it will accept URLs that have the ENTRY-POINT URL as the prefix. This mechanism is used to pass and receive parameters in the Web-API URL path. The components of the path following the base path are separated and stored in pseudo attributes PATH1, PATH2, and so on. |
| /_IN | Inside ROUTINE or API code | Inside a routine /_IN points to the input (first) parameter passed to it and for the API it points to the Input Message. |
| /_OUT | Inside ROUTINE or API code | Inside a routine /_OUT points to the output (second) parameter passed to it and for the API it points to the Output Message. |
| /_WHERE | DATABASE-TABLE | This is set by your program before invoking "Database open" command to specify the filtering for the results from the table. It should be syntactically correct "Where" portion of the SQL query that will get the results. E.g., /Employee/_WHERE = "Department = 'HR'" |
| /_ORDERBY | DATABASE-TABLE | This is set by your program before invoking "Database open" command to specify the ordering of the results from the table. It should be syntactically correct "Order By" portion of the SQL query that will get the results. |
| /_LIMIT | DATABASE-TABLE | This is set by your program before invoking "Database open" command to specify a limit on the maximum number of rows to retrieve. |
| /_STATUS | DATABASE-TABLE, DATABASE-QUERY, MONGO-COLLECTION | This is set as a result of a Database operation. A value of zero (0) indicates success and any other value means an error. |
| /_STATUSTEXT | DATABASE-TABLE, DATABASE-QUERY, MONGO-COLLECTION | This is set as a result of a Database operation and contains the textual explanation of the Status code. |
| /_EXECUTEJS | WEB-SCRAPER | Assigning a value (should be a valid JavaScript) to this pseudo variable causes the script to be executed in the scraper session. |
| /_document | MONGO-COLLECTION | Represents the JSON document for storage in a MongoDB collection. Before calling a save or update operation, the application must set it and after a read operation, the application can access the document from this. |
| /_id | MONGO-COLLECTION | Represents the Mongo Document Id. For a fetch operation, the application must set it and after a save operation, the Id can be retrieved from here. |
| @_SESSIONID | /SESSION | A unique Id of your session. |
| @_READONLY | /SESSION | A value you can set in your program to indicate to that the contents of the SESSION should not be saved when the service completes. |
| @_COUNT | TAG | Returns the number of instances of the TAG that are present in the Data tree. |
| @_NODENAME | TAG | Returns the name of the Tag (as in definition). |
| @_XML | TAG | Represents the Serialized XML of the node. You can read this value to get the XML and you can assign a value to this, which will result in the given XML to be extracted under the node. |
| @_JSON | TAG | Represents the Serialized JSON of the node. You can read this value to get the JSON string and you can assign a value to this, which will result in the given JSON to be extracted under the node. |
| @_BASE64 | TAG (STRING) | Represents the Base64 encoded value of the contents of the node. |
| @_YY | TAG (DATE and DATETIME) | The 2-character year component of the date. |
| @_YYYY | TAG (DATE and DATETIME) | The 4-character year component of the date. |
| @_QUARTER | TAG (DATE and DATETIME) | The quarter of the year in which the date falls. |
| @_M | TAG (DATE and DATETIME) | The month component of the date without zero padding on left. |
| @_MM | TAG (DATE and DATETIME) | The 2-digit month component of the date, zero padded if necessary. |
| @_MON | TAG (DATE and DATETIME) | The 3-character (short) name of the month component of the date. |
| @_MONTH | TAG (DATE and DATETIME) | The full name of the month of the date. |
| @_D | TAG (DATE and DATETIME) | The date component of the date without zero padding on left. |
| @_DD | TAG (DATE and DATETIME) | The 2-digit date component of the date, zero padded if necessary. |
| @_DAY | TAG (DATE and DATETIME) | A string representation of the Day name. |
| @_DOW | TAG (DATE and DATETIME) | A single digit number indicating the day of the Week. |
| @_hh | TAG (DATETIME) | The 2-character hours component of the time. |
| @_mm | TAG (DATETIME) | The 2-character minutes component of the time. |
| @_ss | TAG (DATETIME) | The 2-character seconds component of the time. |
| @__{MethodName} | TAG | This a short-cut method to invoke a Method that will receive the node as input. This evaluates to the return value from the Method. |
| Pseudo Elements used in the Data tree. | ||
The following pseudo elements can be used to dynamically override values in your project config.
| Pseudo Element | Applies To | Description (@.. are attributes). |
|---|---|---|
| @_URL | WEB-SERVICE | Assigning a value to this attribute will override the value of URL for the Web Service. The assignment should be done prior to calling the service. |
| @_SOAPACTION | WEB-SERVICE | Assigning a value to this attribute will override the value of SOAP-ACTION for the Web Service, if it is a SOAP service. The assignment should be done prior to calling the service. |
| @_CURLOPTIONS | WEB-SERVICE | Assigning a value to this attribute will override the value of CURL-OPTIONS for the Web Service, if it is configured to use curl for invocation. The assignment should be done prior to calling the service. |
| Pseudo Elements used to override options in . | ||
Statements
The statements (or commands) are what you use in your program to do things. They are the basic building blocks of your program, and you put them in the right order to convert your business algorithm into a working program. In Web-IDE, you do not need to remember any command names as the drag-drop intuitive UI does it all for you.
| Statement | Description |
|---|---|
| // | The comment - it is ignored at the time of execution. You will use this to add descriptive text in your program to make it more readable. |
| Abort | Aborts the execution of the service immediately. |
| Break | Breaks out of the innermost iteration and advances to the next statement. |
| Compute | This will take an expression and evaluate it. The most common use for this is to move values around in the Data tree. |
| Call | This calls a Java method in your program. |
| Continue | Skip the rest of the current iteration block and proceed to next iteration. |
| Database | This is used to perform a database operation such as fetch or save data rows. |
| DbQuery | Database Queries in your project are used for more complex reads and updates in your database. [SQL programming knowledge is required]. The DbQuery statement operates on a database query. |
| Declare | It declares a local variable inside a ROUTINE and then accessed as /_LOCALS/Name. |
| Execute | Executes a Routine in your project. |
| Execute2 | It is a variant of Execute above - it executes the program associated with another Web-API (part of the same Project), without invoking it as a service. |
| ExportXml | It exports a node into a serialized XML string. The Pseudo attribute "_XML" does the same, but this allows you to attach an XML namespace while doing the export. |
| ForEach | Iterate over all instances of a Node (by name) - requires a block of statements. |
| if | A compound statement allowing conditional execution - requires a condition and a block of statements. Optionally the if block can have any number of following "else if" blocks. |
| JmsSend | Sends an MQ message to an MQ (JMS) destination. |
| Node | Performs miscellaneous operations on the nodes in the Data tree. |
| NodeCopy | Copy the complete sub-tree under a a node to another node. |
| NodeInit | Initializes the content of a node from a static XML string (separately defined in the same project. |
| Return | Return from the currently executing Routine or Web-Service immediately. |
| Sleep | Sleep, or create a delay of given number of milliseconds. |
| WsCall | Call (invoke) a Web-Service (or Web-API) - the invoked API can be any Web-service, not necessarily hosted on . The call is initiated asynchronously, allowing you to launch parallel requests. You must use WsControl to wait for the request to finish. |
| While | Execute the given statement block, while the condition is true. The condition is evaluated each time before entering the loop and it stops when the condition becomes false. |
| With | Like ForEach, except the block executes only once. |
| WsControl | Control (stop or wait for) a previously called Web-Service. |
| WebScrape | Execute a command in the Web Scraping session. Compute statements are used to set and get values to/from a web page in a scraping session. |
| WebSocketGet | Used to receive data from the socket channel in a WebSocket service. |
| WebSocketSend | Used to write data to the socket channel in a WebSocket service. |
| WsSyncCall | A WsCall that executes synchronously. I.e., it waits for the call to complete before returning. |
| Xslt | Performs Xslt based transformation. [Xsl programming knowledge is required] |
| Executable statements used in programming. | |
Iterating over Nodes/Rows
One the things you will find yourself doing very frequently in your programs is iterating over a set of nodes. Typically, when your program receives an input message containing a list, you must process all items in the list. Another similar requirement is when you read a database and you must process all rows that are in the result set.
In abstraction world, both these situations are treated as the same. That a Database is a different entity from a Data tree node, is hidden from you and you view each case as a single case of iterating over a set. The "ForEach" statement is used for iterating over a set. You specify a Data path to represent the set - this is best understood through the examples-
- /REQUEST/Employee would represent all "Employee" elements under "/REQUEST". The ForEach loop will start at the first Employee node and then proceed sequentially through the list.
- The Data path /REQUEST/Employee[3], would start at the 3rd Employee node and will continue up to the end.
- If "Employee" is a DB table in your project, then the Data path /Employee, would represent all rows in the currently open result set on the table. When the loop completes, the system automatically advances to the next row in the result set. The result set is opened using "Database open" or "DbQuery open" statements.
The ForEach statement allows an optional "Where" condition, which causes the loop to skip over nodes where the given expression evaluates to false. This also works with Database Tables and MongoDB collections. When an expression is used when looping over Database or Mongo nodes, the Database/Collection open and close operations are automatically performed using the expression provided - no explicit open/close is required.
Loop VariableWith the "ForEach" statement you can specify a Loop Variable - the name of a Data element declared under /_LOCALS or /VARIABLES with Data type "NUMBER". If a loop variable has been specified, it will be updated with every iteration to indicate the sequence number of the current loop, starting at 1.
Web-API Security
The Internet is a public medium, and unless the information your Web-API deals with is free and public, it needs to be protected from unauthorized use. For starters, it is recommended that you use the secure HTTP (or HTTPS) for endpoints of your Web-API. This ensures that the data being exchanged cannot be read by a third-party and only the sender and receiver can see its contents.
A basic security mechanism can be used that requires every request to be accompanied by a username and a password. The username and password are sent with the request as HTTP headers and before the service is invoked the credentials are verified against stored usernames and passwords.
Currently, the most popular authentication mechanism is the one using OAuth. This requires the username and the password to be sent only once to an authentication service. The authentication service returns a token which can be used as an authentication substitute in subsequent calls.
This is optional and the hosted Web-APIs can choose to implement their own authentication.
Wizard generated applications have OAuth security enabled based on the user accounts in the application itself.
Lastly, a firewall type of control can be applied on the Web-APIs so that only the requests originating from a specified set of IP addresses are entertained. runtime allows you to apply IP address controls on the Web-APIs.
| Step | Seq | Description |
|---|---|---|
| Create Username/password database | 1 | Login to the Zoapiio.com website using your access credentials |
| 2 | From your control panel, select "API Access" from menu | |
| 3 | On the page, create the usernames and respective passwords. | |
| Choose API security | 1 | Login to the Web-IDE using your developer password. |
| 2 | Create a new project or open an existing project. | |
| 3 | Create a new Web-API by selecting "New ENTRY-POINT" from the context menu under "Business Flows" node in the schema. Or select an existing ENTRY-POINT. | |
| 4 | On the properties page of the ENTRY-POINT, select the security mechanism you want to use. | |
| Know the API URL | 1 | Before the Web-API that you have built can be called from a client application, you must know its URL. |
| 2 | The URL of the Web-API is constructed by prefixing your dedicated container URL to the URL you have specified with your Web-API (ENTRY-POINT). | |
| 3 | The URL of your container is- "https://my.zoapiio.com/{your instance code}". You can get your instance code from the account panel, where you signed-up. It is also visible in the URL of the Web-IDE page. | |
| 4 | requires all HTTP service URLS to start with "/wc". So, if your Instance code is "ABC" and your Web-API URL is "/wc/myapi", then the service can be reached at the URL "https://my.zoapiio.com/ABC/wc/myapi". | |
| Authentication APIs | 1 | Please note that the development of the client to consume the API requires
knowledge of programming.
|
| 2 | Also note that, if you are using the Application Wizard to generate your
application, the front-end of the generated application
automatically manages this for you.
There are two APIs provided by for authentication. |
|
| 3 | /auth/authenticate (prefixed with your container URL). Your client application
will send the user credentials using the HTTP Basic authentication mechanism.
This means that the request will contain the following HTTP header. Please
lookup up the "Basic HTTP authentication" on the web for details. Authorization: Basic [Base64(username:password)] The service will return a single text line containing "FAILED" (in case of failure) or "OK " followed by the authentication token (in case of success). |
|
| 4 | /auth/validate (prefixed with your container URL). Your client application
will send the user credentials using the HTTP Bearer (OAuth) authentication
mechanism. This means that the request will contain the following HTTP
header. Please lookup up the "OAuth HTTP authentication" on the web for
details. Authorization: Bearer [Authorization token] The service will return a single text line containing "FAILED" (in case of failure) or "OK " followed by the user name, using which the authentication was performed (in case of success). |
|
| 5 | You do not need to explicitly call the validate API and is only provided as a blank call to verify that your token is valid and current. For Web-APIs configured to use API Security, every request will be automatically validated. | |
| Call the APIs | 1 | The Web-API will typically be called from a browser-based application or from another server application. |
| 2 | The mechanism of passing the authentication information is same in each case. In case of a browser application, however, you may want to save the "Authentication Token" in a browser cookie, so that your application always has easy access to it. It will be required with every call. | |
| 3 | Your first call to the server in a session would be to the authentication service. | |
| 4 | Once a successful authentication is performed, the client application will send the authentication token with every following request in the session using the OAuth mechanism described in the validation API above. | |
| 5 | Tip: Generally, during the building phase, you may want to keep the API security off or restricted by IP address alone, so that it does not inconvenience your testing process. Once you are ready to roll it out for to your users, you can enable the API OAuth security. | |
| Using to manage your API Security. | ||
User Session
CookiesUser Session represents the information about a client (or user) that is using your application (or services). The session works through HTTP cookies - same Cookies that the websites you visit store on your computer to remember you. You will need to pick a name for the Cookie that will serve this purpose and publish it to the users of your Web-APIs. The clients need to receive this Cookie from the Web-API responses and return with every request to maintain the session. The Web browsers already do that - they remember and return all cookies; your clients need to replicate the same behavior.
JSON Web Token (JWT)
An alternative to Cookies based Session Id, is the JWT. JWT is a more modern approach, and it uses OAuth2. Most customer facing applications, including ZOAPIIO Web and mobile apps, use this approach.
While the Cookie transmission is handled by the browser, the JWT needs to be explicitly added to the HTTP request by the application. Everything else remains the same. You can configure the ZOAPIIO Session to use either of the two mechanisms.
Relational Databases
If you are developing business modules or Web-APIs, chances are you will need to store and retrieve tabular data. Relational databases (RDBMS) are a popular way to store application data in an efficient way. To build database access into your Web-APIs, you do not need to know any technical details about database programming. However, acquiring a high-level overview of SQL is advised. If you have not used databases or SQL before, you should be able to find introductory tutorials on the Internet.
Use the DB assistant to manage your database from the web. You can create, delete and alter tables; import data from CSV files; besides viewing and updating the data.
In your project Schema, create a DATABASE-TABLE node to gain access to a table in the database. The DATABASE-TABLE node will allow you to query and iterate over the table rows and make updates and inserts. If you have more complex queries - both query and updates/inserts - you can use the DATABASE-QUERY node. However, for typical database operations, DATABASE-TABLE is enough.
Database table access is done using the Database statement.
- You create the table in the database first. The table creation is automatically handled if you are using the Application Wizard. If you are not using wizard, you will use the DB Assistant to create your table.
- Declare the DATABASE-TABLE node in the schema and import its definition from the server.
- To Fetch a record using the key, simply assign the value of the Key and do Database
fetch. Process the data. E.g.
/Employee/Id = 100
Database fetch Employee
/Response/Name = /Employee/Name
...
- To open a cursor and process all records, use either
/Employee/_WHERE = "Name = 'John'"
Database open Employee
ForEach /Employee
...
End ForEach
Database close Employee
or
ForEach /Employee Where Name == "John"
...
End ForEach
For most common situations of database access, you should never need to use Database Queries. This is an advanced subject and requires the knowledge of SQL syntax - if you do need to use Queries and do not know SQL, you should take the help of a programmer in your team. SQL is quite simple in syntax; you should also be able to write simple SQL statements with some help from Google. You should use Database Queries, when-
- You need to use group functions like Sum(), Count(), etc. with or without the Group By SQL clause.
- You need to fetch rows from the database by joining two or more tables.
- You need to fetch or update the database using SQL statements that have substitution parameters.
- Other advanced database access needs like dynamic SQL.
SQL query processing engine allows a query to be executed which has placeholders in it for values to be provided separately. The parameters are positional parameters meaning they are referenced by position and not by name. The Query string will have &1, &2 etc. as positional placeholders and will be substituted with values from the parameter list.
lets you have access to this feature of SQL engine, and takes it a step further. You can have the placeholders in your SQL query which will be passed to the SQL engine. In addition, it allows you to flag some parameters for "Inline Replacement". This means that these parameters are substituted into the query string by runtime, even before passing it to the SQL processing engine. This method of substitution allows you to even replace keywords within the query - something that SQL parameter substitution does not allow.
| Step | Seq | Description |
|---|---|---|
| Define the Query | 1 | Add a DATABASE-QUERY Tag to your project. The queries can be read or update and should be appropriately flagged. |
| 2 | Enter your SQL statement with placeholder parameters if any. | |
| 3 | Under the DATABASE-QUERY Tag, create a QUERY-PARAMETER Tag for each parameter you have used. Declare them in the same order as they appear in the query string. The Query Parameters will have names, even though are positional so that they can be accessed inside the programs. | |
| 4 | If your query is a read query, then for each Column that is part of the result set, declare a TAG Tag under the DATABASE-QUERY and given them proper Data types. The WebIDE has a context menu command to automatically create the TAG names from the query. | |
| Access the Query | 1 | Inside your program, assign the values to the parameters using their Data path- /{Query-name}/{parameter-name}. |
| 2 | Then use the DbQuery statement to execute the query. | |
| 3 | If this was a read query, run a ForEach look on the query Tag and process the results. | |
| Using Database Queries in your project. | ||
Dynamic SQL
If your application requires the use of dynamic SQL, you can handle it by-
- Defining a Database Query with one "inline Substitution" parameter containing the entire Query, or.
- Assigning a value to _SQL attribute of the DATABASE-QUERY node with the dynamic SQL. If you have defined any Query Parameters, then the SQL you assign here must have the same number/type of Parameter placeholders - represented by a ? (SQL syntax).
Mongo Databases
MongoDB from Google is a no-SQL database. It has been optimized for specific types of use-cases that deal with JSON documents. There are other no-SQL databases in technology scape, but MongoDB has gained a large following and is by far the most popular.
If your application requires the use of MongoDB, ZOAPIIO has an abstraction for it.
For details, refer to the Reference Guide.
Background Jobs
Background Jobs are needed to perform daemon functionality. allows you to create any number of background jobs in your application.
- Create an ENTRY-POINT service that runs in an infinite loop. I.e. it runs perpetually in a loop performing a certain task and then waiting for a while. The wait is essential otherwise the service can overload your application and affect performance.
- Launch the service from the Application initialization section of the DECLARATIONS area in your project. Add the following line inside the onInitialize() function.
public void onInitialize(Node node) {
	spawn("/wc/... (Service URL)", "<REQUEST></REQUEST> (The Request XML for the service)");
}
Scraping Web data sources
supports web scraping using a Selenium driver interface. Your default instance (free tier) does not have a scraping pool configured. You can upgrade to a paid instance and request for a scraping pool to be configured according to your needs. See the Reference Guide at the end of this document for full description of scraping commands.
- You script the scraping session starting with an 'open' command and ending with the 'close' command.
- You script the scraping session by interacting with the page and controlling it in the script.
- The elements on the page are referenced using Data Path syntax.
- To get contents from the page or to type values into input fields, you use the 'Compute' statement.
- To otherwise interact with the page like clicking on elements, you use the scraper commands.
- To Execute a JavaScript inside the page, put the JavaScript in a string and then assign it to the {Scraper}/_EXECUTEJS pseudo node.
Edge node architecture
The default configuration of the Selenium session is to invoke a real browser program (Firefox, or Chrome etc.) that runs in a virtual X environment. This means that the browser is not visible as a window. Since the scraper script is executing on the server, which does not have a console, this becomes a necessity. Please note that the 'screenshot' scraper command works for the virtual environment as well. So, it would produce a real image of the contents of the browser window.
supports another architecture for scraper configuration which allows the scraping agents to be opened on computers other than the server running the scraping script. There is a standalone 'dumb' edge scraping agent, which runs the browser under the control of the server.
- Any number of edge nodes can be provisioned in the scraper pool.
- The edge nodes can be on desktop or laptop computers running on home or office networks.
- The browsers running on edge produce visible windows and can even be manually interacted while the server is controlling it.
- The requirement is that the edge node and the server must be able to connect with each other using an IP address.
- In home or NATted office networks, this is not possible. To deal with such situations a VPN or a port forwarding mechanism can be set up that will enable this. Please consult a networking specialist for details.
Application Properties
Application Properties are system wide fixed settings (or constants), which are used at multiple places in your application. Your project simply references these settings by name. These settings are kept at a common place (file, a database table or even on the Internet). If these values change, only the common store needs to be updated without impacting your application.
allows you to configure and use application properties using a database table. Files cannot be used because you do not have direct access to your container, but Web-IDE has the DB assistant tool to let you access your databases. Your instance comes pre-configured with a database table for this purpose and is mapped to a property set, that is available for access in your programs. The table should be named "Z_Properties" and should be mapped to a property set "MainProps".
| Step | Seq | Description |
|---|---|---|
| Define Properties | 1 | Launch the "DB Assistant" tool from your Web-IDE session. You should see your configured database and the list of tables under it. |
| 2 | Locate the table Z_Properties - this is your properties table. Make sure you do not drop or alter this table in anyway. | |
| 3 | Right click on the table and click "Select From", then follow the UI to see the current settings. | |
| 4 | Use "Insert Into" or "Update" menu commands to create or change settings. You can leave the "Locale" column blank. Also, the property names are usually components separated by a dot (.). E.g., company.name.shortname, company.name.fullname - this makes the naming structured and intuitive. | |
| Access the Properties | 1 | The Property set can be accessed inside your project with PROPERTY-SET Tag. Under project root, add the PROPERTY-SET and select "MainProps" from the drop-down. |
| 2 | You can now access properties using Data path /MainProps/{property-name}. When using the property name substitute the dot (.) characters with underscore (_). So company.name.shortname should be accessed as /MainProps/company_name_shortname. | |
| Using Application Properties in your project. | ||
Using Java
The scripting is very high-level, powerful, and compact. It is designed to help ease the development of Web-APIs. However, it cannot replace a conventional programming language on the grounds of flexibility. An example is formatting values. A language like Java offers string processing tools that can let you reformat data in the way you desire. Should your project have a need for such processing, you can use Java Methods in your project.
When writing the Java code, you can access the Schema contents using built-in functions (methods), as described below. The Java functions also allow you to access other features in the system, which have not been abstracted through the business rules.
If the processing you want to perform using Java is simple and can be expressed in a few lines of Java code, you can use the "Java" business rule and write the code in-line embedded within your rules. For more complex processing use the METHOD node, described below.
Please note that the knowledge of Core Java and Java DOM API is required. If necessary, take help of an experienced Java programmer in your team.
| Step | Seq | Description |
|---|---|---|
| Code your Method | 1 | You declare the Java methods in your project by adding a "METHOD" node in the schema. |
| 2 | The code inside the method looks like any Java method and it has a fixed prototype. It receives two objects of class org.w3c.dom.Node. They are called 'in' and 'out', to represent an input node and the output node. There is no restriction, however, on how you use them. You can read and update both nodes. | |
| 3 | The Java methods in you your project inherit some
key methods from its parent class. The most commonly used methods are
"get" and "set", which allow you access to the contents of the Data tree.
get(Node contextnode, String path): will return you the value in the node represented by the path. If the path is not an absolute path. (I.e. does not start with a "/"), the path is searched under the context node. You can use Method parameters (in or out) as the context path. get(Node contextnode, String path, String value): will set the value in the node represented by the path. |
|
| 4 | Strict warning: Do not manipulate the contents of the nodes and the Data tree using Java DOM API methods. Your program will crash. | |
| Call the Method | 1 | The Java method can be called from your Web-API program using the Call statement. You pass the two parameters to the Method - both must be Data paths identifying the nodes in the Data tree. |
| 2 | To save a lot of repetitive declaration, make user of the TYPES feature. | |
| Using Java inside your project. | ||
Security related Restriction
There are certain restrictions on how you write the Java modules, for the reasons of security.
- You cannot use the following global objects/classes/keywords of Java - System, management, Class, and package.
- ZOAPIIO has a built-in method runCommand which executes shell commands and is reserved for internal use. It cannot be used in your programs.
- You cannot use the getClass and forName methods of Java.
- When using the 'new' keyword of Java you must provide the full Class name of the object being instantiated. You can only create objects from the following Java packages - java.lang, java.util, java.text, java.time, org.json and java.io (Some java.io Classes may not be allowed).
- If you want to declare a local class in your program, the name must start with an underscore (_), and you can use the 'new' keyword to instantiate it.
Built-in Functions
The following functions (methods inherited from base implementation) can be directly called from your Java code.
| Function | Description |
|---|---|
| Data access. | |
String get(Node node, String path); |
Read and return an element from the contents of the current Document (schema). The second parameter is the element's path. The first parameter is the node, relative to which the path is interpreted. When a method is called, two Node parameters are passed as parameters to it. If the path is absolute (starting with a /), the node has no significance, but a non-null value must be passed. |
void set(Node node, String path, String value); |
Update an element in the current Document (scheme). First two parameters are same as for get above. The value to be set is the additional third parameter. |
Node resolvePath(String path, Node ref, boolean create); |
When navigating the document tree, it is sometimes useful to resolve an intermediate node and then continue traversal relative to that. This method can be used for that. It does not return the contents of the node pointed to by path, but the node itself. The returned node can then be used in other calls to get, set, or resolvePath. If create is true the node is created if not already present. If resolution fails, a null is returned. |
| General utilities. | |
String getURL(String url); |
ZOAPIIO has elaborate support for calling APIs as already explained in this guide. Sometimes, it is more convenient to simply call a URL using GET or POST method. getURL method lets you do just that. If postdata is provided, it becomes a POST call and the provided data is passed as contents for the post. The result is returned as a String. |
long getUniqueNumber (String key);
|
This returns a system-wide Unique number within the scope of the key provided. The returned number are sequential running numbers. |
float parseFloat(String f); |
A convenient method to parse a float number from the given string. If parsing fails, the default (second parameter) is returned. If default is not provided, zero is returned. |
int parseInt(String num); |
Like parseFloat - equivalent functionality for parsing integers from String. |
String randomWord(int size); |
Create a random word (not a dictionary word) of given size and return. |
String randomNumericWord(int size);
|
Create a random numeric string (integer) of given size and return. |
String randomPhrase();
|
Return a random phrase. |
int randomInt(int min, int max);
|
Returns a random integer. |
double randomGaussian(int mean, int stddev);
|
Returns a random Gaussian double precision number. |
| Encryption. | |
String encryptString(String data); |
Encrypts the given string using DES (reversible) encryption. If a password if provided, it is used for encryption - otherwise, the default encryption key set for your container is used. |
String decryptString(String data); |
Corresponding decryption functions. |
String b64digest(String data); |
This function creates a digest (one-way hash) of the input data using the given hash algorithm (must be one of 'MD5', 'SHA-1', or 'SHA-256'). The algorithm parameter is optional and defaults to MD5. Since the digest is a binary value, it is Base64 encoded so that it can be stored and used as a string. |
String hexdigest(String data); |
Same as b64digest (above) except that the result is HEX encoded instead of Base64. |
| JWT Management. | |
String getJWTToken(String subject, String scope, String userid, String other); |
Creates and returns a JWT, signed using the Server's configured secret key. The key is configured by the system administrator and generally you do not need to know what it is. The same key is used when resolving the JWT (See below). The JWT is created with four fields in it - subject, scope, userid, and other. With , you can run multiple applications in the same instance. Each user application will have its own user space and users of one cannot be mixed with others. The subject is typically the name of the application, and scope is any arbitrary chosen value to segregate the user scope. userid is a unique identification of the user and the other field can contain any extra information that needs to be put into (and later retrieved) the token. |
String getJWTToken(byte[] secret, String subject, String scope, String userid, String other); |
This is same as the getJWTToken() above, except you provide the key for signing the token. |
String resolveJWTToken(String jwt, String scope);
|
Resolves the JWT (using the server's secret key), verifies the scope value present in the JWT matches the provided scope and returns the value of the userid field if check succeeds. Upon failure, null is returned. |
String[] resolveJWTToken(String jwt, String[] fields);
|
This is a variation of the resolveJWTToken method, which verifies the signature and then returns one or more fields from the token. The fields that need to be returned are specified as second parameter. E.g. if fields is set to ["subject","userid"], the values of subject and userid will be returned. The return value is either null (if signature verification fails) or a String array with as many elements as in the input parameter with respective values. |
String getBasicOAuthToken(String user, String pass); |
Create a Basic OAuth Token from the given Username and password. This simply puts the user information in correct format and encodes it. |
| Create ZIP (Compressed) files. | |
Object openZipFile();
|
This and the next two methods, provide you a convenient mechanism to create ZIP compressed files. You initialize the zip file using this method. The initialized ZIP file is temporary - it is deleted when closed. The method returns a handle Object to the created file, which should be used in subsequent calls to operate on it. |
void addZipEntry(Object zip, String path, String contents, boolean mmdecode);
|
Adds a file to the ZIP. The path is the path of the file in the ZIP, and the contents are provided as a String. The mmendecode parameter indicates that the contents are Base64 encoded and should be decoded before storing in the ZIP. When adding binary files, you should Base64 encode it and specify this flag as true. |
void dumpZipFile(Object zip, OutputStream out);
|
This call is made to close the ZIP file and return the contents. The ZIP contents must be received in an OutputStream Java object. The temporary ZIP files are deleted after this call. |
| Temporary file storage. | |
Object openTempFile(); |
This and the next four calls below allow you to create temporary files. Use this to create a temporary file - the handle Object is returned which is used in subsequent operations on the file. |
				void appendTempFile(Object tempfile, String data);
				void appendTempFile(Object tempfile, byte[] data);
|
You can append string or binary data to the temp file. |
void deleteTempFile(Object tempfile);
|
The temporary file is deleted. |
String nameTempFile(Object tempfile);
|
Returns the name of the temp file. |
byte[] getTempFile(Object tempfile); |
These calls are used to get or read the contents of the temp file. |
| Read and create PDF files. | |
Object openPDFDocument(); |
This and the following calls allow you to read and create PDF documents. This creates or opens a PDF document and returns a handle to it. The handle is used in the subsequent calls. The data for existing documents is provided as Base64 encoded binary data. |
void addPDFImage(Object pdf, String data);
|
Append an image to the PDF document. The data is provided as Base64 encoded string representation of the image. |
void addPDFDocument(Object pdf, String data, int[] pages);
|
Append pages from another PDF document. The other PDF document should be Base64 encoded and passed as data parameter. The list of pages to copy from the other PDF document is passed as the last parameter. |
String closePDFDocument(Object pdf);
|
This closes the PDF document, discards the context, and returns the contents in Base64 representation. |
Object[] splitPDFDocument(Object pdf);
|
This splits the PDF document into pages. Each page becomes an independent PDF document, and the resultant array is returned. Each page can then be separately processed. |
String imageFromPDFDocument(Object pdf, String type);
|
This assumes that the PDF document contains an image, extracts it and returns. If multiple images are present such as in header or footer of the document, it selects the largest one, assuming that is the primary image on the page. The type can be "png", "jpg", etc. and the returned image is in that format with Base64 encoding. |
String htextFromPDFDocument(Object pdf);
|
Extracts readable text from the PDF document in hypertext format. See OCR and PDF Parsing for details. |
| Create Excel (spreadsheet) files. | |
Object openExcelDocument();
|
This and the next two calls allow you to create Excel (xlsx) documents. This starts a new Excel document and returns a handle to it. The handle is used in the subsequent calls. |
void addExcelCel(Object xls, int row, int col, String data);
|
Use this to add contents to a cell within the Excel document. |
String closeExcelDocument(Object xls);
|
This closes the Excel document, discards the context, and return the contents in Base64 representation. |
| Data format conversion. | |
String pdf2html(String b64data);
|
Convert a pdf document (Base64 data) into HTML and return. |
String image2thumbnail(String b64data, String contenttype);
|
Create a thumbnail from an Image. |
String docx2html(String b64data);
|
Convert Word document (docx) to HTML and return. |
String docx2text(String b64data);
|
Convert Word document (docx) to text and return. |
String xlsx2text(String b64data);
| |
String html2text(String data);
|
Convert HTML document to text and return. |
String pdf2text(String b64data);
|
Convert a pdf document (Base64 data) into text and return. |
String[] pdf2image(String b64data, String imagetype, |
This assumes that the PDF is composed of images. It breaks the document into multiple images of the given imagetype and returns as an array. The returned data is in Base64 encoding. ZOAPIIO uses ImageMagick to do this conversion, the command line options for which can be passed as ioptions parameter. |
String xml2json(String xml);
|
Convert an XML to JSON format. |
String[] splitCSV(String csvrow);
|
Takes a single Comma Separated Values row and breaks it into individual values, taking care of quotes and removing them in the process. |
| OCR and PDF parsing. | |
String image2htext(String b64data, String ioptions, String toptions);
|
This allows you to perform OCR operation on an image and return the result as an XML String, which contains recognized text and position attributes. See OCR and PDF Parsing for details. Before running the OCR, you can apply transformations on the image. ZOAPIIO uses imageMagick on the server, and you can pass image processing options (imageMagick convert command line options) as second parameter. Tesseract command line options can be passed as the third parameter. See online documentation on tesseract. Both image and tesseract options parameter can be null, implying defaults. |
String pdf2htext(String b64data);
|
This allows you to extract text from a Text mode PDF in the hyper text format similar to the OCR operation (althouth no OCR is actually required). See OCR and PDF Parsing for details. |
String htext2map(String htext, String templatejson, |
This allows you to further process the recognition results in htext format into meaningful content. See OCR and PDF Parsing for details. |
| XML parsing/serialization. | |
				Document parseToDOM(InputStream in);
				Document parseToDOM(String in);
|
Parse an XML string into DOM. |
String renderAsXML(Node node);
|
Render an XML node as a string. |
| Character escaping. | |
String URLSafe(String s);
|
Make a string safe to be included in a URL as a query parameter. |
String XMLSafe(String s);
|
Make a string safe to be included in an XML string. |
String SQLSafe(String s);
|
Make a string safe to be included in a SQL string. |
String JavaScriptSafe(String s);
|
Make a string safe to be included in a JavaScript code stub. |
| Miscellaneous. | |
javax.mail.Message getEmailMessage(Node node); |
When writing handler for ENTRY-POINT-EMAIL, you need to access the Email message that has been received. The Java Email Message object is too complex to be abstracted into business rules, so you must write the handler in Java. This call allows you to retrieve the message for processing. |
String verifyFacebookToken(String appid, String userid, String token); |
Server-side verification of the Facebook token returned when using 'Sign-In with FaceBook'. The FaceBook browser integration returns a userid and the token - both must be provided for verification. The JSON object containing the user details is returned. |
String verifyGoogleToken(String appid, String userid, String token); |
Server-side verification of the Google token returned when using 'Sign-In with Google'. The Google browser integration returns a token - the token and the Google registered appid must be provided for verification. The JSON object containing the user details is returned. |
| Built-In Java functions in your project. | |
jQuery Java Adaptation
aims to make data processing flexible, easy and compact. A very popular product - jQuery - also has the same goals with respect to processing data in JavaScript (front-end programming). If you are a jQuery programmer, you have another option to process the data in your Project schema.
provides an adaptation of jQuery core functions in Java, allowing you to query and update the data using jQuery like syntax. Let us start with an example-
final float accum[]=new float[1];
accum[0]=(float)0.0;
$(in).select("AirInfo > AdditionalDetails > PassengerInfo PaymentReceived")
	.each(new $Operator() {
		public void operate(int seqno, Node n) {
			accum[0]+=parseFloat(get(n));
		}
	});
- Wrap a Java node reference (usually received as parameter to a Method) in $() to enter into jQuery mode.
- Inline function can be created to emulate anonymous functions of JavaScript used in jQuery.
- Create an object of class $Operator and override the operate method which receives the sequence number and the Java node reference as parameters.
- The operate function can access variables outside its scope subject to restrictions placed by the Java language - these variables should be declared final. You can declare them as final Arrays if you need to update the contents inside.
- The example above uses an array of 1 element to achieve this.
- See the reference below for full details.
| Class/Method | Description |
|---|---|
| $() | Enclose a Java node reference inside $() to start using jQuery functions on it. |
| $Operator | Local class to create an anonymous function for jQuery mode operations. |
| selector | Selector is a string that lets you define a criteria for selecting the first node in the tree under the root on which the .select function is invoked. It resembles a jQuery selector but does not support all features of the jQuery selector. Supported features are-
|
| .select(String selector) | This will select the first node that are matched by the given selector, under the root. This is a key difference from the jQuery, which returns all elements matching the selector. Wherever a list is implied, such as .each and .length functions, it refers to all the nodes with the name under its parent. E.g.
|
| .children(String selector) | Will select the first child of the root node matching the selector. |
| .length() | This counts the number of nodes in the parent with the same name. |
| .text() | Returns the text (value) of the node. |
| .text(String value) | Updates the text (value) of the node. |
| .attr(String name) | Returns the attribute value for the named attribute. |
| .attr(String name, String value) | Sets the attribute value for the named attribute. |
| .delete() | Deletes the node. |
| .append(String xml) | The xml is parsed and added as the last child of the node. |
| .each() | Executes an operation on all nodes in the selection. See $Operator above on how to create the anonymous function. |
| jQuery Java adaptation functions. | |
OCR and PDF Parsing
server comes with Google's tesseract OCR engine included. The access to OCR features is provided through built-in Java Methods listed above. Tesseract uses an internal XML format to return recognized data from a page. ZOAPIIO uses the same format to work with the OCR API. Additionally, ZOAPIIO provides an API to recognize text from a text PDF file as well. For consistency, the same hypertext format is used for the PDF recognition API as well.
Introduction to HTEXT Format
The HTEXT format contains the details of the text recognized along with the location on the page and the font attributes. A sample is given below-
<div class='ocr_page' id='page_1' title='image ""; bbox 0 0 319 33; ppageno 0'>
   <div class='ocr_carea' id='block_1_1' title="bbox 0 0 319 33">
      <p class='ocr_par' dir='ltr' id='par_1_1' title="bbox 10 13 276 25">
         <span class='ocr_line' id='line_1_1' title="bbox 10 13 276 25; baseline 0 0">
            <span class='ocrx_word' id='word_1_1' title='bbox 10 14 41 25; x_wconf 75' lang='eng' dir='ltr'>
               <strong>the</strong>
            </span>
            <span class='ocrx_word' id='word_1_2' title='bbox 53 13 97 25; x_wconf 84' lang='eng' dir='ltr'>
               <strong>book</strong>
            </span>
            <span class='ocrx_word' id='word_1_3' title='bbox 111 13 129 25; x_wconf 79' lang='eng' dir='ltr'>
               <strong>is</strong>
            </span>
            <span class='ocrx_word' id='word_1_4' title='bbox 143 17 164 25; x_wconf 83' lang='eng' dir='ltr'>
               on
            </span>
            <span class='ocrx_word' id='word_1_5' title='bbox 178 14 209 25; x_wconf 75' lang='eng' dir='ltr'>
               <strong>the</strong>
            </span>
            <span class='ocrx_word' id='word_1_6' title='bbox 223 14 276 25; x_wconf 76' lang='eng' dir='ltr'>
               <strong>table</strong>
            </span>
         </span>
      </p>
   </div>
</div>
Notes on the HTEXT format
- The format looks like HTML.
- The result is hierarchically broken down into page, para, lines and words.
- The title attribute contains the bbox, representing the bounding box of the text location on the input image.
- The w_xconf value represents the recognition confidence (0-99).
- The dir='ltr' means the text direction is left to right.
- The lang attribute is the input text language, 'eng' or English in the example above.
Guided Page Parsing
takes the text recognition from images and PDF documents a step further. Once the HTEXT representation of a page is obtained, an application will typically scan the page and extract relevant parts. This step requires looking at the topology of the page and then breaking the contents into extractions meaningful to the application.
Page Template
The page parsing is done using a page template. In this template you provide a guide to what you are trying to extract from the page. The template is a collection of template items, and each item has the following settings.
| Field | Description |
|---|---|
| FieldName | This is the name of field and used to identify the extracted value from the output. |
| LeftFrom | LeftFrom and LeftTo (below) together define a vertical band on the page where the field to be extracted lies. The values are in percentages, optional and the default it the full page. For example, to look only in the right half of the page, use values 50, 100. |
| LeftTo | See LeftFrom above. |
| TopFrom | TopFrom and TopTo (below) together define a horizontal band on the page where the field to be extracted lies. The values are in percentages, optional and the default it the full page. For example, to look only in the top half of the page, use values 0, 50. |
| TopTo | See TopFrom above. |
| Pattern | This is a regular expression that the recognized field should match. Please refer to public documentation on Java regular expressions. |
| ColLabel | ColLabel and RowLabel (below) are used to extract fields from a page layout that is tabular in nature. Both these are regular expressions and specify a value for the row heading or the column heading or both for the field. |
| RowLabel | See ColLabel above. |
| Fields in a template item. | |
The Page template is a JSON representation of the list of template items. An example is shown below.
[
	{
		"FieldName": "VoucherCode",
		"LeftFrom": "33",
		"LeftTo": "100",
		"TopFrom": "0",
		"TopTo": "0",
		"Pattern": "[A-Z][A-Z0-9]{9}",
		"ColLabel": "",
		"RowLabel": ""
	},
	{
	}
	...
]
Page Parsing Result
The page parsing returns two structures, both as JSON formatted arrays - one for all words on the page along with their location on the page and the second with matched words as "Name-Value" pairs.
For both the results strings (JSON), you provide a template each. The template should describe each element of the JS array that you want returned. The template contains placeholders for the substitution values enclosed within two % characters. The following is the list of placeholders.
Result JSON 1
- PageH: Page height,
- PageW: Page width,
- BboxX1: Bounding box coordinate X1,
- BboxY1: Bounding box coordinate Y1,
- BboxX2: Bounding box coordinate X2,
- BboxY2: Bounding box coordinate Y2,
- Text: The matched text.
Example Result Template 1
{
	"Text":"%Text%",
	"PageW":%PageW%,
	"PageH":%PageH%,
	"BboxX1":%BboxX1%,
	"BboxY1":%BboxY1%,
	"BboxX2":%BboxX2%,
	"BboxY2":%BboxY2%
}
Result JSON 2
- Name: The name of the field as in the input template,
- Value: The value of the text that was recognized.
Example Result Template 2
{
	"FieldName":"%Name%",
	"FieldValue":"%Value%"
}
ZOAPIIO Application Wizard
With the Application Wizard, you can build your fully functional business application in a matter of hours. Refer to the Wizard User Guide for details.
ZOAPIIO Web/Mobile Apps
Building Web/Mobile apps is easy and convenient with . The development is much faster and can be done will minimal programmer skill. The following types of apps are supported-
- Classical Web application - ZOAPIIO apps uses HTML5, jQUery and Bulma CSS framework.
- PWA - It is based on the classical Web Application with additional feature that it can be installed on a mobile device like an app.
- Mobile App - ZOAPIIO mobile apps are built using the cross-platform tool - Flutter, which means the resultant app can run on all mobile platforms including Android and iOS.
Refer to the Front-end Development Guide for details.