Wizard: User Guide
Introduction to ZOAPIIO Wizard
Application Wizard is a super-fast and convenient way to build full-featured custom business applications on your ZOAPIIO platform. The input to the wizard is a JSON file, which can be created using any plain text editor. There is also a convenient graphical editor to create it in case you do not want to use a text editor or are not fully up to speed on the JSON file contents and its organization.
The Wizard creates the underlying database and the server APIs to manage the data. The Visualization application, bundled with forms the Web front-end of your application. The UI is modern, responsive (Mobile compatible), configurable, intuitive, and consistent.
Process is simple-
- Describe your application, database entities/relationships, presentation, access controls, workflows, and dashboard widgets etc. in the input (JSON).
- Let the wizard build and configure your entire application.
- Deploy the generated application to your instance.
- Launch the visualization app URL, point it to the generated application and start using it right away.
- Optionally and incrementally, add customization to your project's backend and front-end as necessary. Detailed and comprehensive customization is supported by the Wizard.
Anatomy of the Wizard Config
Let us begin the tour with a minimal example - kind of the customary "Hello World". The example below is minimal to the extent that is necessary to demonstrate the core features.
- The minimal app has two entities (database tables) - AssetType and Asset.
- Asset is related to the AssetType. An asset can be of a type. In ZOAPIIO terms, this is referred to as a dependency (foreign key) relationship.
- The Asset has a child entity (one-to-many) - Servicelog, to record maintenance performed on the Asset. This is referred to as the parent-child relationship.
- A record in the child entity can only exist if the parent is created first.
- When a record in an entity is deleted, its children are automatically deleted.
- The dependency relationship works a little differently. Two entities can exist independently, and a foreign key reference is created in the dependent entity to the master.
- In our case, Asset is dependent on AssetType.
- In our example, we will add a custom logic that will automatically generate an Asset Code for the asset, when it is saved the first time.
- Our example also has a custom report page, where we will display all assets along with details of the last service performed on it.
- We will also add a custom control to the asset to compute and show, next service due date.
In the listings below, hover over the Highlighted Text to see explanatory tips.
The Configuration
This is the master application configuration that by itself is sufficient for the entire server for visualization to be generated. It contains database, presentation, and behavioral attributes of the application. If your application has customization, then references to the customization code (front-end and backend) are also put here. The visualization application runs off the APIs that are generated by the Wizard from this master configuration.
Let us start by looking at the configuration file first. You should make a Project folder on your desktop and put all project files together, starting with this.
Basicdemo.js
{
   "_comment": [
      "1. Basic Demo App to explain core features."
   ],
   "application": {
      "name": "Basicdemo",
      "title": "Basic Demo App",
      "themes": [
         {
            "name": "default"
            ,"type": "dark"
            ,"title": "Default (Dark)"
         },{
            "name": "theme-a"
            ,"type": "light"
            ,"title": "Alternate (Light)"
         }
      ],
      "userroles": ["super", "management", "operator"],
      "defaultrole": "super",
      "entities": [
         {
            "name": "setting", "label": "Settings"
	    ,"menu": "Setting"
	    ,"properties": [
            ]
	    ,"data": "setting"
	    ,"menuicon": "cogs"
	    ,"icon": "cog"
            ,"tip": "Organization Settings"
	    ,"access": { "full": ["management", "super"] }
	    ,"classification": { "open": "WWR-R-" }
         },{
            "name": "assettype", "label": "Asset Type"
            ,"menu": "Assets"
            ,"properties": [
               {
                  "name": "Category"
                  ,"label": "Asset Category"
                  ,"type": "easyselect:Asset,Resource,Inventory,Consumable,Spare"
                  ,"validation": "required", "cached": true
               },{
                  "name": "Description"
                  ,"label": "Comments"
                  ,"type": "string"
                  ,"validation": ""}
            ]
            ,"menuicon": "toolbox"
            ,"icon": "chevron-circle-right"
            ,"tip": "Asset type definition"
            ,"access": { "full": ["management", "super"] }
            ,"classification": { "open": "WWRR--" }
	    ,"dependents": [
               {
		  "name": "asset"
		  ,"property": "AssetTypeId"
               }
            ]
         },{
            "name": "assetsubtype", "label": "Asset Sub-type"
            ,"menu": "Assets"
            ,"properties": [
               {
                  "name": "Category"
                  ,"label": "Asset Category"
                  ,"type": "select:Asset,Resource,Inventory,Consumable,Spare"
                  ,"validation": "required", "cached": true
               },{"name": "AssetTypeId,AssetTypeName"
                  ,"label": "Asset Type"
                  ,"type": "entity:assettype"
                  ,"validation": "required"
                  ,"cached": true
		  ,"filter": "Category"
               },{
                  "name": "Description"
                  ,"label": "Comments"
                  ,"type": "string"
                  ,"validation": ""}
            ]
            ,"icon": "chevron-circle-down"
            ,"tip": "Asset sub-type definition"
            ,"access": { "full": ["management", "super"] }
            ,"classification": { "open": "WWRR--" }
            ,"dependents": [
               {
                  "name": "asset"
                  ,"property": "AssetSubtypeId"}
            ]
         },{
            "name": "asset", "label": "Asset"
            ,"menu": "Assets"
            ,"properties": [
               {"name": "Category"
                  ,"label": "Asset Category"
                  ,"type": "select:Asset,Resource,Inventory,Consumable,Spare"
                  ,"validation": "required", "cached": true
	       },{"name": "AssetTypeId,AssetTypeName"
                  ,"label": "Asset Type"
		  ,"type": "entity:assettype"
                  ,"validation": "required", "cached": true
		  ,"filter": "Category"
               },{"name": "AssetSubtypeId,AssetSubtypeName"
                  ,"label": "Asset Sub-type"
                  ,"type": "entity:assetsubtype"
                  ,"validation": "required"
		  ,"filter": "assettype"
               },{"name": "Ownership"
                  ,"label": "Ownership"
                  ,"type": "easyselect:Owned,Rented"
                  ,"validation": "required"
               },{"name": "SerialNo,AssetCode"
                  ,"label": "Serial Number"
                  ,"labels": ",Code"
		  ,"type": "multiple"
		  ,"types": "string,string"
                  ,"validation": ""
               },{"name": "POName,POFile"
                  ,"label": "Purchase Order"
		  ,"type": "file"
                  ,"validation": ""
               },{"name": "ServiceDue"
                  ,"label": "Service Due"
		  ,"type": "custom:BDServiceDue"
                  ,"validation": ""
               },{"name": "Description"
                  ,"label": "Description"
                  ,"type": "text"
                  ,"validation": ""
               }
            ]
            ,"icon": "tools"
            ,"tip": "An Asset"
            ,"access": { "full": ["management", "super"] }
	    ,"RESTaccess": true
	    ,"openaccess": false
            ,"classification": { "open": "WWRR--" }
	    ,"handler": { "aftersave": "ROUTINE.AfterAssetSave" }
	    ,"children": [
               {
                  "name": "servicelog"
                  ,"label": "Service Log"
		  ,"properties": [
                     {"name": "DateServiced"
                        ,"label": "Date of Service"
                        ,"type": "date"
                        ,"default": "today"
                        ,"validation": "required"
                     },{"name": "Description"
                        ,"label": "Service Comments"
                        ,"type": "string"
                        ,"validation": ""
                     }
                  ]
               }
            ]
         },{
            "name": "report", "label": "Asset Report"
	    ,"data": "report"
            ,"menu": "Assets"
	    ,"properties": [
               {"name": "AssetTypeId,AssetTypeName"
                  ,"label": "Asset Type"
                  ,"type": "entity:assettype"
                  ,"validation": "required"
               }
            ]
            ,"icon": "boxes"
            ,"tip": "The asset report"
	    ,"editor": "BDAssetReport"
            ,"access": { "full": ["management", "super"] }
            ,"classification": { "open": "------" }
         },{
            "name": "user", "label": "Users"
            ,"menu": "User"
            ,"properties": [
            ]
	    ,"data": "user"
            ,"menuicon": "user-ninja"
            ,"icon": "user"
	    ,"bootuser": "Username=admin,Password=nopassword,Name=Administrator"
            ,"access": { "full": ["management", "super"] }
            ,"classification": { "open": "WWWWRR" }
         },{
            "name": "usergroup", "label": "Teams"
            ,"menu": "User"
            ,"properties": [
            ]
	    ,"data": "usergroup", "icon": "users"
            ,"access": { "full": ["management", "super"] }
            ,"classification": { "open": "WWWWRR" }
         },{
            "name": "userprofile", "label": "My Profile"
            ,"menu": "User"
            ,"properties": [
            ]
	    ,"data": "userprofile", "icon": "users"
            ,"access": { "full": ["management", "super"] }
            ,"classification": { "open": "WWWWRR" }
         },{
            "name": "b2cuser", "label": "Customer"
            ,"menu": "User"
            ,"properties": [
            ]
	    ,"data": "b2cuser"
            ,"icon": "user-circle"
            ,"access": { "full": ["management", "super"] }
            ,"classification": { "open": "WWWWRR" }
            ,"handler": {
               "beforeregister": "ROUTINE.BeforeRegister"
               ,"afterregister": "ROUTINE.AfterRegister"
            }
         }
      ],
      "customization": {
         "scripts": [
            {
               "name": "misc"
               ,"file": "Basicdemo_misc.js"
            }
         ],
         "styles": [
            {
               "name": "misc"
               ,"file": "Basicdemo_style.css"
            }
         ],
         "helpfiles": [
            {
               "name": "basic"
               ,"title": "Essential User Guide"
	       ,"file": "Basicdemo_help.html"
            }
         ],
         "handlers": [
            {
               "name": "custom"
	       ,"file": "Basicdemo_custom.webc"
            }
         ]
      }
   }
}
Server-Side Customization
- In the config file, we mentioned the presence of the server customization in the application definition. So the Wizard will be expecting this file.
- When generating the application, leave blank when asked for the file.
- After the application is generated, modify it and add your custom additions - Services, Routines, Methods, even changes to the schema.
- Then from the WebIDE menu select "File -> Save Custom Changes". This will download the file containing only the changes you have made.
- When you must generate the application again, simply provide the custom changes file and these will be automatically added to the project after the generation is complete.
- You can, of course, repeat the same cycle multiple times. Edit the project any number of times and then save the custom changes. Remember to include the latest saved changes every time you generate.
Basicdemo_custom.webc
<PRMLCONFIG CONFIG="RRML">
<ROUTINE NAME="AfterAssetSave">
  <BIZ-RULE OPCODE="Comment" P1="Generate the AssetCode if blank."/>
  <BIZ-RULE OPCODE="Return" CONDITION="/_IN/AssetCode > """/>
  <BIZ-RULE OPCODE="Compute" P1="/_IN/AssetCode = /_IN@__GenerateAssetCode"/>
</ROUTINE>

<METHOD NAME="GenerateAssetCode">
private String GenerateAssetCode(Node in, Node out) {
	String type=get(in, "AssetTypeName");
	String serial=get(in, "SerialNo");
	while (type.length()<2) type+="X";
	return type.substring(0,2)+serial;
}
</METHOD>
</PRMLCONFIG>
Client-Side Customization
Basicdemo_misc.js
// Asset Report
function BDAssetReport (divid, params, form) {
	this.divid=divid;
	this.form=form;
	this.params=params;
	this.data=null;
	//
	this.voptsrq=this.form.getProperty('voptsrq', 'env');
	this.vdatarq=this.form.getProperty('vdatarq', 'env');
	this.assettypeid=params.AssetTypeId;
	// Fetch the data from the server.
	this.getData();
}
// Class methods to implement the report.
BDAssetReport.prototype.getData = function() {
	var qry='vapp/getdata/asset+servicelog/_';
	var reqobj={}, req={}; reqobj['asset']={};
	reqobj['asset']['AssetTypeId'] = this.assettypeid;
	req[this.vdatarq]=reqobj;
	req[this.voptsrq]=[
		{'name': 'LIMIT', 'value': 100000}
	];
	this.form.getProperty([qry, req], 'query', [this.renderReport, this]);
}
BDAssetReport.prototype.renderReport = function(data) {
	this.data=data;
	var assets=data.asset||[];
	var servicelog=data.servicelog||[];
	var tabledata=[];
	var columns=[
		{'title': 'Asset Name'},
		{'title': 'Asset Type'},
		{'title': 'Ownership'},
		{'title': 'Last Service'}
	];
	for (var i in assets) {
		var d=assets[i];
		var assetid=d.Id;
		var lastservice='';
		for (var j in servicelog) {
			if (servicelog[j].ParentId == d.Id && servicelog[j].DateServiced > lastservice)
				lastservice=servicelog[j].DateServiced;
		}
		var item=[d.Name, d.AssetTypeName, d.Ownership, lastservice];
		tabledata.push(item);
	}
	var html='';
	html+='<div id="'+this.divid+'_g" style="width: 100%"></div>';
	html+='<table id="'+this.divid+'_dt" class="display compact"></table>';
	$('#'+this.divid).html(html);

	var buttons=[ 'copy', 'excel', 'pdf', 'csv', 'print' ];
	$('#'+this.divid+'_dt').DataTable({
		dom: 'Bfrtip'
		,buttons: buttons
        	,data: tabledata
        	,columns: columns
		,order: []
	});
}

// JS Class for custom Control Property - ServiceDue.
function BDServiceDue (div, names, form) {
	this.div=div;
	this.form=form;
	this.vdatarq=this.form.getProperty('vdatarq', 'env');
	this.assetid=form.getProperty('Id');
	this.render();
	this.updateValue();
}
BDServiceDue.prototype.updateValue = function() {
	// If this is an attached asset, get its availability from the host asset.
	var qry='vapp/getdata/servicelog/'+this.assetid;
	var reqobj={}, req={};
	req[this.vdatarq]=reqobj;
	var that=this;
	this.form.getProperty([qry, req], 'query', function(data) {
		var slogs=data.servicelog||[];
		var lastservice='';
		for (var i in slogs) {
			if (lastservice < slogs[i].DateServiced) lastservice=slogs[i].DateServiced;
		}
		var html='';
		html+='<span>'+lastservice+'</span>';
		$(this.div).html(html);
	});
}
BDServiceDue.prototype.render = function() {
	var html='';
	html+='<table width=100%></table>';
	$(this.div).html(html);
}
BDServiceDue.prototype.get = function(valonly) {
	if (valonly) return '';
	return [''];		// Not saved, only displayed.
}
BDServiceDue.prototype.handleFormChange = function(name) {
}
User Help File
Basicdemo_help.html
<!-- Single page help file. -->
<style>
body { font-family: Helvetica; color: #555; font-size: 16px; }
.content { padding: 2px 315px 0 7px; }
.title { font-size: 25px; font-family: Helvetica; color: #18335e; }
h1 { font-size: 22px; color: #222; font-family: Arial; }
h2 { font-size: 18px; color: #333; font-family: Helvetica; }
h3 { font-size: 17px; color: #555; font-family: Arial; text-decoration: underline; }
</style>

<div class="content">
<p class="title">Basic Demo App: User Guide.</p>

<h1>Introduction to Basic Demo</h1>

<p>Lorem ipsum dolor sit amet, consectetur adipiscing elit. Aenean hendrerit eros convallis,
consectetur dui vel, vestibulum velit. Vivamus eget odio ex. Proin ut nulla nunc. Sed felis mi, porttitor
et dolor id, aliquam blandit felis. Cras vulputate non massa sed sollicitudin. Aliquam rutrum augue in
nulla dictum, in rhoncus est tristique. Donec at purus et risus lobortis mollis nec eget arcu. Sed tempus
velit at porttitor convallis. Quisque aliquam, turpis in auctor tincidunt, leo massa ornare nibh, nec
tempus dolor ex id sapien. Aenean mollis sapien vel magna ultrices pellentesque. Aenean eu nisl dapibus,
sodales enim sed, efficitur nisl.</p>

</div>
Running the Wizard
Create a folder on your desktop, where you will save the configuration files. When you save something from the WebIDE designer, it will always be saved in your Downloads folder. You will need to manually move it to your project folder. Login to the Designer and follow the Menu File > New Project > App Wizard. The Wizard page will appear.
- If you have a Wizard configuration file saved from an earlier run, or you manually created the configuration, choose the file and click on "Load from File".
- The JSON code will be displayed in the box below for reference only - you are not required to edit it directly.
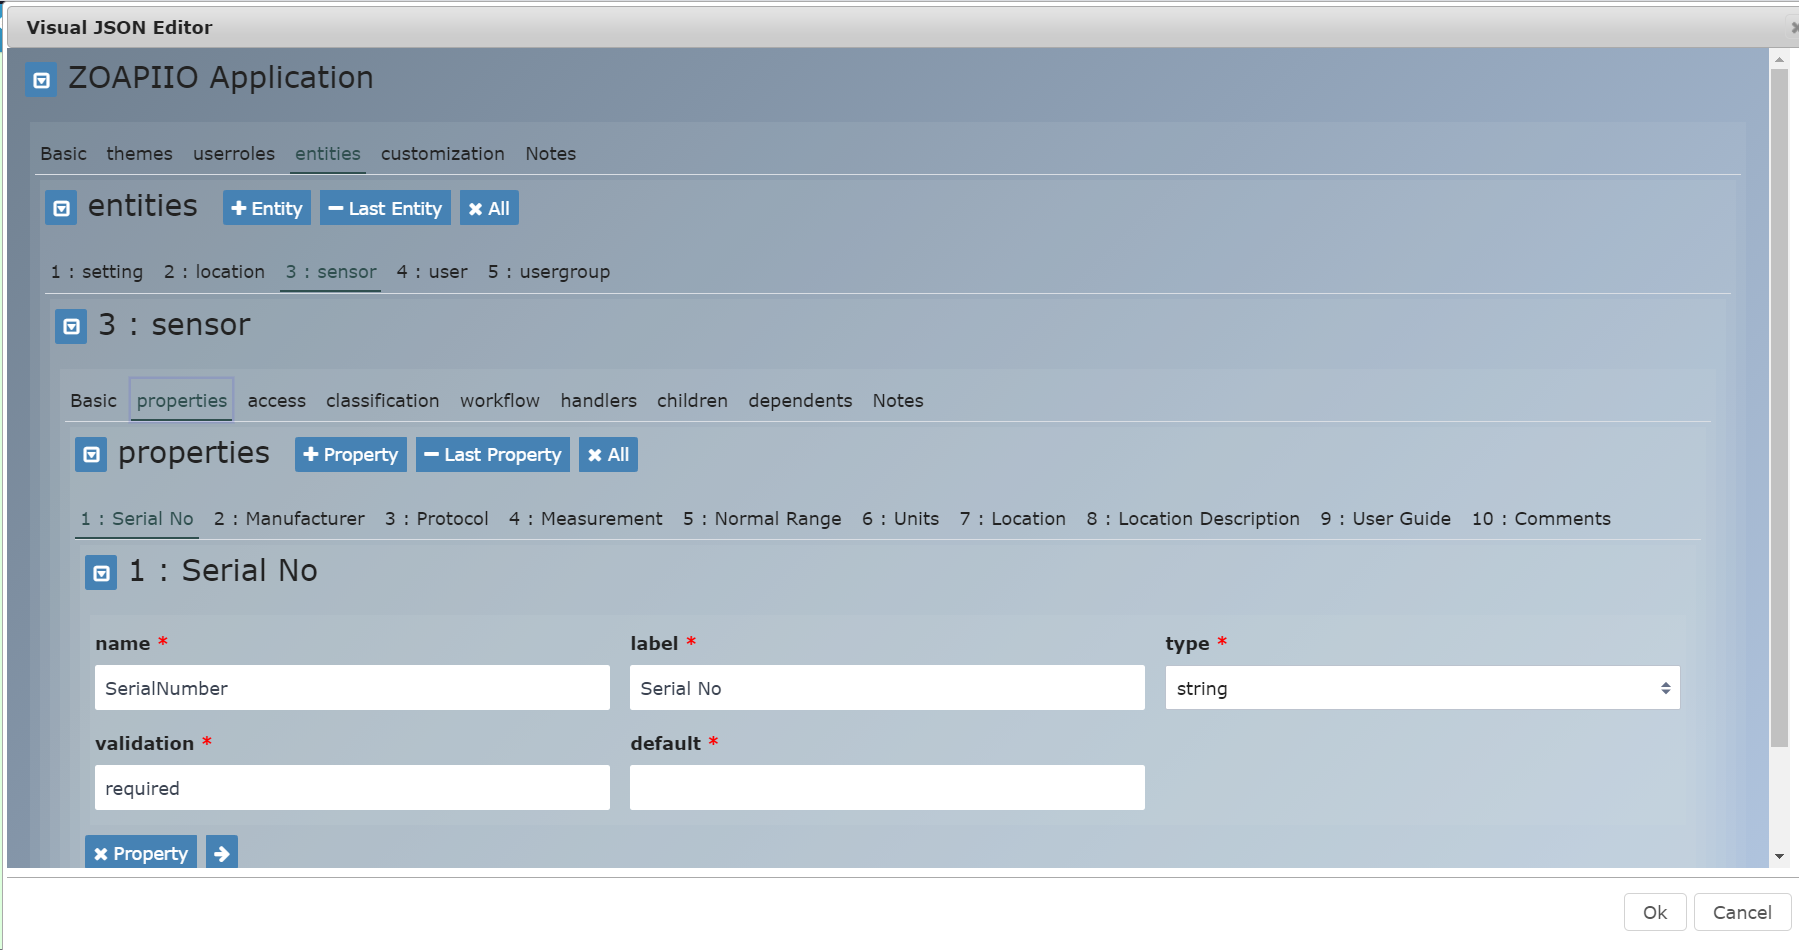
- To edit the configuration, click on "Visual Editor" to open the visual editor. However, you may find that using a text editor to edit the configuration is more convenient.
- Navigate the intuitive Visual Editor and create your application definition.
- Always locally save the configuration JSON, because it cannot be retrieved from the server. To save the JSON file locally, use "Save to File" button.
- How much of visual editing and manual editing you want to use if up to your preferences.
- Once ready, click on the "Continue" button. The wizard input will be validated and if all is well, you will go to the next page, where you can select the "customization" files that are a part of your application. Click "Continue".
- The application will be generated.
- Deploy the generated application to your instance.
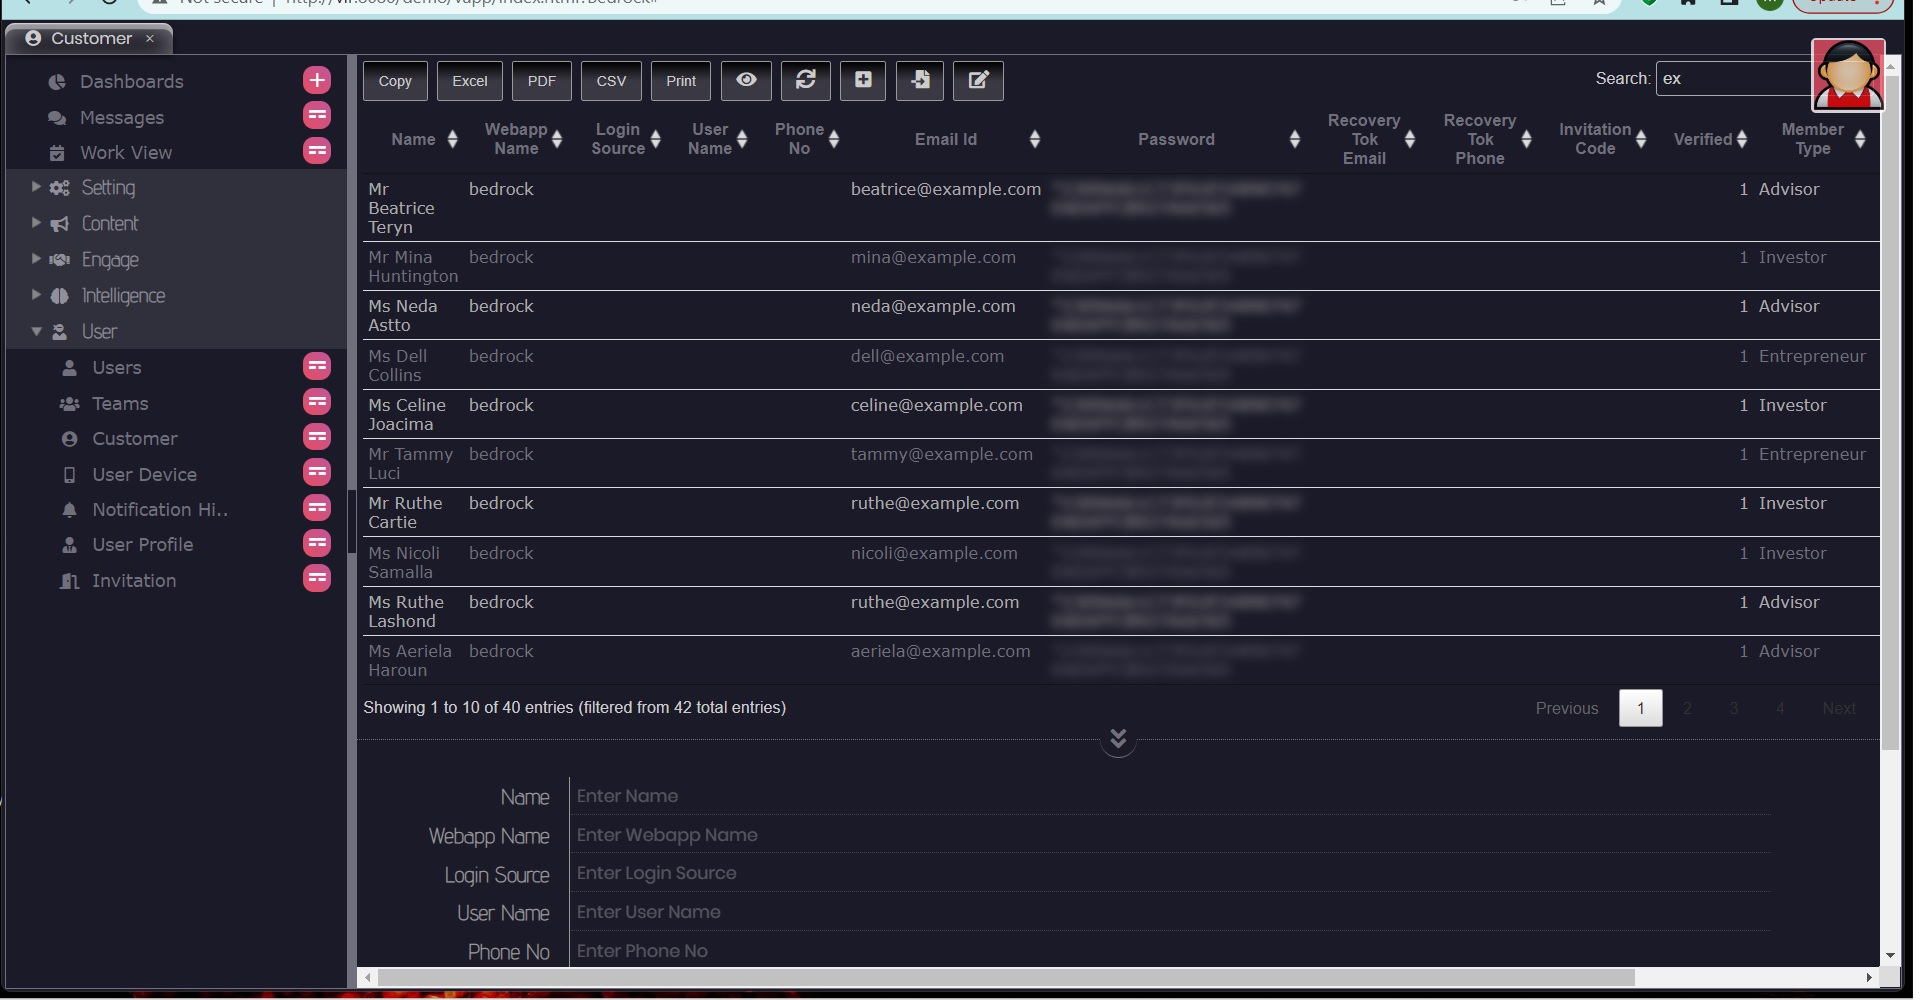
Running your Application
The visualization app is available as a part of your instance. You can launch it on your generated application using the URL-
{Your Instance URL}/vapp/index.html?{Your App name}
You can create multiple Wizard applications and use them as independent applications.
- It is advised that you use the bootuser feature to automatically create the first user in the database.
- If you have created the boot user, login using the credentials and start using the application.
- If you have not used the boot user, then at the time of application launch, it will give you an opportunity to create the first user from the app itself.
- Create user accounts for other users who will be using the app.
You are all set. This completes our "Getting Started" part of the guide.
In the following sections we will go through more details and nuances that almost all real-world applications require - such as workflow control, access control, documents & attachments, dashboards etc.
Regenerating the Application
You can safely regenerate the Wizard application, anytime you change the configuration.
- If you have made any changes to the entity declarations, the tables would be regenerated without loss of data".
- If you have not made any change to the entity declarations or server handlers, and only making change to a supporting customization file, then you should not regenerate the application.
- Before clicking on "Continue", change "Update Artifacts Only" to Yes. The designer will only update the artifacts, without regenerating the entire application.
The Generated Application
Let us look at the generated application. You do not need to know most of these things, but you might require familiarity with the APIs that drive the visualization app. For instance,
- You may use these APIs while building customization in your app. You will notice that in our example app above, we used one of these APIs (getdata) to fetch data from the server.
- You may want other applications to integrate with your app using these APIs.
While calling the API from a custom front-end component (report, or control), the access rights of the logged-in user are used. For inbound integration with another application, explicit authentication must be performed before calling the services. See Integrating other Applications.
The Request/Response Object
Reproduced below are some snippets from the data schema - The hierarchical data structures that the APIs use to communicate. The REQUEST node is the abstraction of the HTTP request - GET as well as POST - for the service APIs. What you see below is not the full structure - you will notice the elements with DATATYPE names like "TYP:..." - this refers to a detailed reusable structure declared elsewhere.
  <REQUEST>
    <HTTP-HEADER NAME="Authorization"/>
    <HTTP-HEADER NAME="User-Agent"/>
    <TAG NAME="VAPP_voptsRQ" DUPLICATES="true">
      <TAG NAME="name" DATATYPE="STRING" ISKEY="true"/>
      <TAG NAME="value" DATATYPE="STRING"/>
    </TAG>
    <TAG NAME="VAPP_vechoRQ">
      <TAG NAME="ContentType" DATATYPE="STRING"/>
      <TAG NAME="FileName" DATATYPE="STRING"/>
      <TAG NAME="B64Data" DATATYPE="STRING"/>
    </TAG>
    <TAG NAME="VAPP_vanyRS">
      <TAG NAME="*ANY" DATATYPE="" DESCRIPTION="No Structure"/>
    </TAG>
    <TAG NAME="VAPP_vautoRQ">
      <TAG NAME="ColumnName" DATATYPE="STRING"/>
      <TAG NAME="EntityName" DATATYPE="STRING"/>
      <TAG NAME="ValuePrefix" DATATYPE="STRING"/>
    </TAG>
    <TAG NAME="VAPP_vloginRQ" DATATYPE="TYP:VAPP_vloginType"/>
    <TAG NAME="VAPP_vdataRQ" DATATYPE="TYP:VAPP_vdataType"/>
    <TAG NAME="VAPP_vwidgetRQ" DATATYPE="TYP:VAPP_vwidgetType"/>
    <TAG NAME="VAPP_vpushRQ" DATATYPE="TYP:VAPP_vpushType"/>
    <TAG NAME="VAPP_vprocletRQ" DATATYPE="TYP:VAPP_vprocletType"/>
  </REQUEST>
This is the Response message structures used by the APIs. Again, this is not the complete structure.
  <TAG NAME="Response">
    <TAG NAME="Status" DATATYPE="STRING" DUPLICATES="true"/>
    <TAG NAME="TimeStamp" DATATYPE="DATETIME"/>
    <TAG NAME="VAPP_vdataRS" DATATYPE="TYP:VAPP_vdataType"/>
    <TAG NAME="VAPP_vprocletRS" DATATYPE="TYP:VAPP_vprocletType"/>
    <TAG NAME="VAPP_vwidgetRS" DATATYPE="TYP:VAPP_vwidgetType"/>
    <TAG NAME="VAPP_vfileRS" DATATYPE="STRING"/>
    <TAG NAME="VAPP_vechoRS" DATATYPE="STRING"/>
    <TAG NAME="VAPP_vautoRS">
      <TAG NAME="result" DATATYPE="STRING" DESCRIPTION="Result Values" DUPLICATES="true">
        <TAG NAME="Value" DATATYPE="STRING"/>
        <TAG NAME="Count" DATATYPE="NUMBER"/>
      </TAG>
    </TAG>
    <TAG NAME="VAPP_vloginRS" DATATYPE="EXT:Basicdemo_userType">
      <TAG NAME="B2C" DATATYPE="TYP:Basicdemo_b2cuserType"/>
    </TAG>
    <TAG NAME="VAPP_vconfigRS">
      <TAG NAME="config" DUPLICATES="true">
        <TAG NAME="Name" DATATYPE="STRING"/>
        <TAG NAME="RecType" DATATYPE="STRING"/>
        <TAG NAME="Type" DATATYPE="STRING"/>
        <TAG NAME="Data" DATATYPE="STRING"/>
      </TAG>
    </TAG>
  </TAG>
Reproduced below is a section of the TYPES node. The declarations under TYPES represent the definition only - not the actual data. These structures are referenced in the schema using the TYP:... notation.
  <TYPES>
    <TAG NAME="VAPP_vdataType">
      <TAG NAME="Dashboards" DUPLICATES="true">
        <TAG NAME="Id" DATATYPE="NUMBER"/>
        <TAG NAME="Name" DATATYPE="STRING"/>
        <TAG NAME="Type" DATATYPE="STRING"/>
        <TAG NAME="Owner" DATATYPE="STRING"/>
        <TAG NAME="OwnerGroup" DATATYPE="STRING"/>
        <TAG NAME="Classification" DATATYPE="STRING"/>
        <TAG NAME="Access" DATATYPE="STRING"/>
        <TAG NAME="Data" DATATYPE="STRING"/>
        <TAG NAME="Description" DATATYPE="STRING"/>
      </TAG>
      <TAG NAME="Polygons" DUPLICATES="true">
        <TAG NAME="Id" DATATYPE="NUMBER"/>
        <TAG NAME="Name" DATATYPE="STRING"/>
        <TAG NAME="Owner" DATATYPE="STRING"/>
        <TAG NAME="OwnerGroup" DATATYPE="STRING"/>
        <TAG NAME="Classification" DATATYPE="STRING"/>
        <TAG NAME="Access" DATATYPE="STRING"/>
        <TAG NAME="Data" DATATYPE="STRING"/>
        <TAG NAME="Description" DATATYPE="STRING"/>
      </TAG>
      <TAG NAME="MessageSummary" DUPLICATES="true">
        <TAG NAME="Username" DATATYPE="STRING"/>
        <TAG NAME="UnreadCount" DATATYPE="NUMBER"/>
      </TAG>
      <TAG NAME="setting" DATATYPE="TYP:Basicdemo_settingType" DUPLICATES="true"/>
      <TAG NAME="assettype" DATATYPE="TYP:Basicdemo_assettypeType" DUPLICATES="true"/>
      <TAG NAME="asset" DATATYPE="TYP:Basicdemo_assetType" DUPLICATES="true"/>
      <TAG NAME="servicelog" DATATYPE="TYP:Basicdemo_servicelogType" DUPLICATES="true"/>
      <TAG NAME="report" DATATYPE="TYP:Basicdemo_reportType" DUPLICATES="true"/>
      <TAG NAME="user" DATATYPE="TYP:Basicdemo_userType" DUPLICATES="true"/>
      <TAG NAME="usergroup" DATATYPE="TYP:Basicdemo_usergroupType" DUPLICATES="true"/>
      <TAG NAME="b2cuser" DATATYPE="TYP:Basicdemo_b2cuserType" DUPLICATES="true"/>
      <TAG NAME="userdevice" DATATYPE="TYP:Basicdemo_userdeviceType" DUPLICATES="true"/>
      <TAG NAME="pushmessage" DATATYPE="TYP:Basicdemo_pushmessageType" DUPLICATES="true"/>
      <TAG NAME="message" DATATYPE="TYP:Basicdemo_messageType" DUPLICATES="true"/>
      <TAG NAME="workflow" DATATYPE="TYP:Basicdemo_workflowType" DUPLICATES="true"/>
      <TAG NAME="notification" DATATYPE="TYP:VAPP_vnotificationType"/>
    </TAG>
    <TAG NAME="Basicdemo_assetType">
      <TAG NAME="Id" DATATYPE="NUMBER" ISKEY="true"/>
      <TAG NAME="ParentId" DATATYPE="NUMBER"/>
      <TAG NAME="Name" DATATYPE="STRING"/>
      <TAG NAME="Owner" DATATYPE="STRING"/>
      <TAG NAME="OwnerGroup" DATATYPE="STRING"/>
      <TAG NAME="Classification" DATATYPE="STRING"/>
      <TAG NAME="Access" DATATYPE="STRING"/>
      <TAG NAME="Deleted" DATATYPE="NUMBER"/>
      <TAG NAME="UpdatedBy" DATATYPE="STRING"/>
      <TAG NAME="UpdatedAt" DATATYPE="DATETIME"/>
      <TAG NAME="AssetTypeId" DATATYPE="NUMBER"/>
      <TAG NAME="AssetTypeName" DATATYPE="STRING"/>
      <TAG NAME="Ownership" DATATYPE="STRING"/>
      <TAG NAME="SerialNo" DATATYPE="STRING"/>
      <TAG NAME="AssetCode" DATATYPE="STRING"/>
      <TAG NAME="POName" DATATYPE="STRING"/>
      <TAG NAME="POFile" DATATYPE="STRING"/>
      <TAG NAME="ServiceDue" DATATYPE="STRING"/>
      <TAG NAME="Description" DATATYPE="STRING"/>
      <TAG NAME="workflow" DATATYPE="TYP:Basicdemo_workflowType" DUPLICATES="true"/>
    </TAG>
  </TYPES>
Service APIs
The two most important services used in customization and integration are the services that allow you to query and update the entity data - getdata and setdata. gethistory, and dumpfile are also useful and deal with fetching data.
getdata
This service API allows you to retrieve data using a non-trivial query structure.
- You can query data for a single entity (parent or child) or an entity along with one or more of its child entities.
- You can provide detailed filters for each of the entities in the query.
- There is a separate options object that can be passed to control what data and how much data should be retrieved.
- You can optionally fetch workflow information (history/status) with each entity.
The API is accessed at the following url
{Instance URL}/wc/{Wizard Project Name}/vapp/getdata/{P1}/{P2}/[P3]
| URL Component | Description | |
|---|---|---|
| {Instance URL} | This is the base URL of your ZOAPIIO instance. If the instance is hosted on ZOAPIIO cloud, you can get this from the control panel. If you are using on-premise hosting, your system administrator would know the base URL. | |
| wc | This prefix is mandatory for all ZOAPIIO HTTP services, to distinguish it from other types of services (SOAP, GRAPHQL, etc.) supported by ZOAPIIO. | |
| {Wizard Project Name} | This is your project name - in the case of our example this is Basicdemo. You can create multiple projects in the same instance, and this makes sure there is no conflict between the services of different applications. | |
| vapp | This path component is added by the Wizard to suggest that this is a service used by the visualization app. | |
| getdata | The name of the service itself. | |
| {P1} | The first path parameter to the service is the name(s) of the entity to be fetched.
|
|
| {P2} | The second path parameter is the ParentId filter. For root level entities, this is always 0 and for child entities, this is the Id value of the parent. A wildcard value of '_' (underscore) can be used if no filtering on ParentId is required. |
|
| [P3] | The third, last and optional path parameter is the Id value if the entity record. This is a convenient way to fetch all data for an entity record, when its Id value is known. Filters are ignored when Id is present. | |
| The getdata API. | ||
Filter criteria and options are sent to the query as POST data in JSON format. An example of getdata query is-
POST http:.../wc/Basicdemo/vapp/getdata/asset+servicelog/_
{
	"vdataRQ": {
		"asset": {
			"SerialNo": "ABC%"
		},
		"servicelog": {
			"DateServiced": "2022-12-01,2022-12-31"
		},
	},
	"voptsRQ": [
		{ "name": "FETCH", "value": "SUMMARY" },
		{ "name": "LIMIT", "value": 500 }
	]
}
Following are the rules for specifying the filter selection-
- If the Id value is present in the URL (Path parameter 3), then filter selection is not applied - only the record with the given Id will be returned.
- If one or more child entities are a part of the query, filter can be specified for each entity separately - as in example above.
- When fetching parent-child entity records together, the parent selection is run first, and the child selection is only applied to the child entities of the matching parents.
| Property Type | Filter Value | |
|---|---|---|
| string, text | The value can use '%' as the wildcard. | |
| integer, decimal, date, datetime | Two integer/decimal/date/datetime values representing the range must be provided
separated by a comma. If you want to search for a fixed value, repeat the same
value as both ends of the range. If a single value is provided, it implies
a range with the given value as the lower end and no upper end. If the first
value is blank, that implies range with no lower end. Examples-
|
|
| decimalrange, daterange | When searching for a property declared as a range - two names will be there - the search should use the first name and specify a single value. The search will look for entity records where the value given is within the range. | |
| hashtag | hashtag is a datatype supported by the Wizard. The input for the hashtag consists of multiple space separated words, each acting as a tag, which can be independently used in the search. The search value is a list of words separated by spaces and will search all entity records, which has all the tags given in the list. | |
| entity | The entity search works like the integer search (see above). Two integer values representing the Id of the target entity should be provided (separated by comma). | |
| getdata API filters. | ||
List of options-
| Query Option | Description | |
|---|---|---|
| FETCH | You can control the level of detail fetched using this option. Values - SUMMARY, FULL (default). Summary only fetches the basic properties - Name, Id and other properties flagged as "cached". (Also see LIGHT below) | |
| LIMIT | This is used to set a limit to the number of records that will be fetched. The default is 100. If multiple entity records are being fetched, this applies only to the primary entity only (first in the list). | |
| LIGHT | A true/false value option. If set to true, any 'file' type properties in the entity are not fetched. Usually, the file objects are large in size, and it is advised to always use option and if required, fetch the file object separately. | |
| SINCE | The value is a date value (yyyy-mm-dd) and only entity records modified on or after that date are fetched. | |
| WORKFLOW | Possible values - ASSIGNMENT. If specified, along with each entity record, its workflow assignment status is also returned. | |
| INCLUDE | This option provides an even finer control of which properties will be fetched. You can provide a comma separated list of property names, which you want returned with the result. | |
| EXCLUDE | This option also controls which properties to return. The property names mentioned in the value list are excluded from the response. | |
| getdata API options. | ||
setdata
This service API allows you to add or update entity data.
- The record level permissions are checked before allowing the update. See Access Control.
- The Meta properties - Id, ParentId, UpdatedBy, and UpdatedAt cannot be updated.
- The Meta properties - Owner, OwnerGroup, Classification, and Access can be updated if your current access credentials allow you to update Privileged properties of the entity record. Caution is advised when updating these properties, because they will affect the access rights to the updated record and your own account may lose access to the record.
- When updating a record, only the values present in the data are updated. This allows you to update only specified properties.
- Multiple entity records of different entity types can be updated in the same API call.
- If Id is present and is non-zero, it implies an update. If the entity record with that Id is not present, the update fails. After update, the updated record is returned.
- If Id is not present or is zero, it implies an add. The data is added, and the newly created record is returned.
The API is accessed at the following URL
{Instance URL}/wc/{Wizard Project Name}/vapp/setdata
The path components are same as that for getdata. This API does not have any path parameters.
The data to be added/updated is sent to the query as POST data in JSON format. An example of setdata query is-
POST http:.../wc/Basicdemo/vapp/setdata
{
	"vdataRQ": {
		"asset": {
			"Id": 19,
			"SerialNo": "ABC0123"
		}
	}
}
When creating a new entity record of a child entity, you must specify the ParentId property, unless you are also creating the parent entity in the same API call.
gethistory
This service API allows you to retrieve history of changes to an entity record.
- The generated app automatically maintains the history of changes to all records.
- To retrieve the history, you must know the Id of the entity record. You can get it by querying the database using getdata.
The API is accessed at the following url
{Instance URL}/wc/{Wizard Project Name}/vapp/gethistory/{Entity Name}/{Record Id}
The query can be called using GET or POST without any post data.
dumpfile
This service API allows you to retrieve just the contents of a 'file' property from an entity record. This is used to retrieve the contents of a file property as viewable raw binary output. The value of 'file' properties returned by getdata are in a Base64 encoded form. This API gets the raw decoded file.
The API is accessed at the following url
{Instance URL}/wc/{Wizard Project Name}/vapp/gethistory/{Entity Name}/{Record Id}/{Property Name}/[thumbnail]
- The {Property Name} path parameter must refer to a file property. File properties have multiple names - use the first name from the list.
- If the file (attachment) property refers to an image, additional path parameter 4 can be set as "thumbnail", to retrieve a thumbnail version of the image.
The query can be called using GET or POST without any post data.
Login Policy
The generated Business application tries to consider various login scenario that are typically used by organizations. Additionally, the Wizard allows you to customize the login process using server-side traps.
Your basic application includes a property-set linked to a database table by the name Z_Properties. You would use this to store application properties that need to be configurable from outside the application. The Wizard uses this property set to let you control the login behavior.
The following is the list of property names that you can add to your application. The properties can be added to your application from the Wizard config file itself (using the properties section under customization) or you can update the settings directly in the database table.
Each of the properties below must be prefixed with the application name separated by a period. E.g. if your application is called Sample, then the setting name would be Sample.login.policy... This will allow each application in your container to use a different login policy.
Also, when adding the property though the Wizard configuration file, the application name is automatically added - you should use only the base name.
| Property Name | Description |
|---|---|
| login.policy.ldap.UseLdap | If 'true', the application will use an LDAP server for user authentication. See How LDAP authentication works below. Other LDAP related settings must be provided. |
| login.policy.ldap.Provider | The URL ldap://... of the LDAP server to use for authentication. |
| login.policy.ldap.Domain | The domain name of the LDAP. '@' and the domain name are appended to the Username before passing to the LDAP server.. |
| login.policy.ldap.SecurityGroup | The name of the security group on LDAP server corresponding to your ZOAPIIO application. This can be blank if security group check is not required. |
| login.policy.ldap.SearchDN | This is used by the LDAP integration to search for the 'memberOf' attribute of the user. You should ask your LDAP administrator for the DN string. |
| login.policy.ldap.BootUser | Even when you login using LDAP and local user record is expected to exist, with the exception of the boot user. When logging in with the boot user a local record may exist but is not required. The login completed and the user is assigned a local role (see next setting). |
| login.policy.ldap.BootUserRole | When logging in as the boot user and if no local user record is found, this role is assigned to the user to complete the login. |
| The settings below do not apply when LDAP is in use. | |
| login.policy.MinPasswordStrength | This controls the minimum password strength that the users must have for their passwords. If a user is created with a lesser strength, the user password is deemed expired and the user must change it at next login. A value of 10 is very liberal and the value of 50 is recommended if you need to enforce strong passwords. |
| login.policy.PasswordExpiryDays | The application will automatically expire the account password after given number of days and the user will need to change it at next login. |
| login.policy.MaxFailedAttempts | The user account is locked after given number of consecutive failed attempts by the user. |
| login.policy.PasswordDisallowReuseLast | When changing the password, the user cannot pick a password that has been used last given number of times. |
| login.policy.MFA | See How MFA works below. To enable it, this must be set to 'optional'. |
| login.policy.MFAType | When using MFA, this must be set to 'TOTP' - which is the only method supported at present. |
| login.policy.MFAIssuerName | A Short string to describe your application. This name will be stored with the user's authenticator mobile app that will allow them to distinguish if from other keys in the app. |
| Login Policy and Control. | |
How LDAP works
The default LDAP integration used by the Wizard generated application delegates the password verification to the LDAP server and locally verifies that the user belongs to a designated Security Group. You can create multiple Security Groups in the LDAP server and designate different groups to different applications.
A local user record for the user may still need to be maintained for other settings like the role and group memberships. The locally stored password is ignored. A user login is accepted if Username/Password are accepted by the LDAP server and the user belongs to the named security group.
Operations like Change Password and Recover Password are not valid in LDAP mode. Remaining User settings and operations proceed normally as for local authentication.
If you need to use a different mechanism of authentication - LDAP or otherwise, you can use the server-side login traps and write custom login implementation.
How MFA works
The Wizard generated application supports 2FA using TOTP (Time based One Time Password). The user must have a mobile device and install "Google Authenticator" mobile app on it. A one-time pairing must be performed that installs a key on the Google Authenticator app. The pairing requires the user to scan a QR code from the application's pairing page.
Once paired, the Google Authenticator will generate a unique 6-digit that changes every 30 or 60 seconds. The generated code is valid only during the time window when it was generated. It is assumed that the person who is in possession of the device is the only one who can get this code. Validating against the TOTP gives an additional level of confidence that the user is who they say they are.
Within your Wizard config file, you can link certain entities to elevated security. The application will ask for 2FA before allowing operations on that entity. Once a 2FA is performed, you can control for how long that elevated security is valid. For instance, if you set it to 10 minutes, the 2FA previlege stays for 10 minutes, after which it must be renewed.
Multi Tenancy and Extranet Users
Multi-tenancy refers to a situation where the same application/database is used to service multiple user organizations. You may want to build an application and sell subscriptions to it to multiple customers - each using it like it is dedicated to them.
A significant implication of this is that the data must be stored in a silo where a tenant has visibility of only their own data.
Wizard applications have multi-tenancy feature in them. This allows an application developed for a single tenant (default) to be easily rehashed for multi-tenancy. The generated APIs have the silo separation baked into them, and the application does not have to worry about the data isolation.
Extranet refers to a situation where a user organization exposes certain features/pages of the application to a partner organization, usually their suppliers or customers. For instance, a supplier may be allowed to raise invoices and view the status of each invoice. Customers may be exposed to a Ticket sub-system, where they can raise complaints and see the progress.
Wizard applications have extranet capability as well.
Multi Tenancy
When generating the application-
- In every entity that needs to be isolated at the tenant level, add a property (field) of type tenantscope with validation set to hidden. This field will be automatically linked to the Tenant Id of the user at the time of creation and will thereafter remain fixed. The data management APIs will automatically apply Tenant Id filter, resulting in the silo.
- Note that the tenenantscope property needs to be there for workflow enabled entities - even if you do not have multi-tenancy in your application. This is because workflow can span across the host and tenants and workflow management needs to keep Tenant Id information.
- Provide a beforelogin server trap handler to resolve the Tenant Id of the user at the time of login. System will not assume the Tenant Id present in the system at the time of login, because that creates a risk of cross-login. Via this handler, you must determine the Tenant Id of the Username so login process can continue. See details under customization.
When using the application-
- When creating users, you need to specify a non-zero Tenant Id for a user when initiating the tenant onboarding.
- Typically, you will have a Tenants table (entity) for managing the Tenants. Simply use the Id value of the Tenant row from this entity as the Tenant Id of the user.
- When the user logs in to the application, any records they create in Tenant bound entities, will be automatically tagged to the Tenant Id of the logged in user.
- The host user and users associated with the host organization should be created with Tenant Id set to zero.
- The host users (Tenant Id - 0) can work with all database records of all Tenants.
Extranet Users
The application uses two User properties to manage Extranet users. The two together uniquely idenfity the extranet user. For local users the Scope is blank, and the Id is 0.
- The User Scope Type. This refers to the type of extranet user. E.g. it can be 'customer', 'supplier' etc.
- The User Scope Id. This refers to the unique Id of the user for that User scope type.
When generating the application-
- Declare the external user types under externalroles in the configuration file.
- When setting the access attribute of the entity, use ext: followed by the external role name to refer to the extranet user class of that type.
- In entities that have binding to extranet users, declare a property of type userscope. System will manage population and scope separation for records in the entity. The user scope is fixed at the time of record creation and is set to the user creating the record.
When using the application-
- When creating users, select the extranet user type.
- The system will automatically assign a unique User Scope Id to the user.
- You must follow a naming convention for the Username to make sure that all Usernames - local and external - are unique.
Integrating other Applications
The Wizard generated application is Web-API driven. This makes it very easy for an external application to get comprehensive access to its database. The APIs detailed above can be called by any external application.
Authentication
The external application must, of course, first authenticate itself before calling the APIs. Popular OAuth2 protocol is used for authenticating external applications. If you are unfamiliar with this protocol, please refer to public resources about OAuth.
- The authentication is performed against the Users created in the visualization app. The same userid and password are used that are used for app login.
- Every API call must carry an Authorization header so that the system can establish identity of the originator of the call.
- There are two types of authorization headers - Basic and Bearer.
- In Basic authorization type, the Username and Password information is coded into a single string and sent. ZOAPIIO authentication API (below) must be called using the Basic authorization.
- If authentication is successful, the call will return a bearer token. The bearer token must be passed as the identity proof with every other ZOAPIIO API call.
The Authentication API is-
{Instance URL}/wc/{Wizard Project Name}/vapp/authenticate
The API is called using GET or POST. Basic OAuth authorization header (with username and password) must be sent with this call. No other information needs to be passed. If successfully authenticated, the following response will be returned.
{
	"SESSIONID": "",
	"SESSIONOWNER": "",
	"INSTANCEID": "39d539e8-000001",
	"RESPONSE": {
		"Status": [
			"OK",
			"{The OAuth Token String...}"
		]
	}
}
The application must parse this response and extract the OAuth Token. This token should be passed as Authorization header with subsequent calls.
REST interface to your data
REST must be explicitly enabled in the master configuration file for entities that require REST access. This is done by setting the "RESTaccess" property of the entity to true. Then the entity data can be accessed using REST over the following API-
{Instance URL}/wc/{Wizard Project Name}/vapp/rest/{Entity Name}
For details about REST, please refer to public resources.
Access Control
The wizard application supports access control at two levels-
- Access to entity pages.
- Access to entity data.
Page Access
The page access is controlled through the user role mechanism. This allows you to configure the app such that each user type (role) sees a different UI. The access property of the entity in the wizard configuration controls this - a sample is given below. There are three access types-
- full: The user has full access to the page.
- readonly: The update operations are disabled, and the user cannot make changes to or delete the entity records.
- demo: This is a special access type, which works like 'full' access except that the Save operation does not actually update the database.
"access": {
	"full": ["operator", "manager"],
	"readonly": ["audit"],
	"demo": ["demo"]
}
- If 'access' specification is omitted, all users are granted full access.
- If 'access' specification is present, at least one role should be given full access. Otherwise, all users are granted full access.
- readonly, and demo access specification is only consulted if at least one user role has full access.
Data Access
Access to entity data is controlled using an access tag associated with each entity record. Each entity record has a Owner (user) and a Group Owner (usergroup). For the purpose of record level access, each user attempting to access it is considered to be of one of the following categories:
- Owner
- Owner Group Member
- Group Manager
- Other
Data inside an entity record is itself divided into two access categories.
- Ordinary data items
- Privileged data items
- All entity properties defined in the wizard configuration are ordinary by default.
- Entity properties can be flagged as privileged by setting 'privileged' setting to true.
- Wizard generated fields "Access", and "Classification", which control access to the entity record, are privileged data items.
The record level access is controlled as follows:
- A unit of access is a single character, one of (-, R, W, or D), representing none, read, write and delete access. Delete access implies Write access and Write access implies Read access.
- For each category of user above, there is a two-character code - one for regular properties and another for privileged properties. So WR indicates write access to general properties but only read access to privileged properties.
- The access to a record is controlled by an eight-character code - two characters for each of the user categories above in that order. So, the access control code would look something like 'DD WR WW R-'
Classification is a simpler way of defining the access code. In the wizard configuration, you define short names for access controls that you would like to use. E.g., you could say "open" represents "WWWWWWWW" (unrestricted), and "private" represents "WW------" (fully restricted). You can have other such access classes representing other intermediate settings, depending upon your requirements to control access. At the time of creating a record, the user can pick a classification, thus setting its access level.
The "Access" column in the entity table stores the access code and the "Classification" column stores the codified access tag. Usually, only one of them is present, but if Access is present, it overrides the Classification value.
Managing Attachments
File data is defined in the Wizard configuration as a regular entity property to be saved in a multitude of configurations.
- In database as a column (optionally compressed)
- In a local file on disk
- In an AWS S3 bucket
How the attachments are handled and saved is controlled through the name, type, and validation attributes of the entity property.
- The type attribute must be set to 'file'.
- The file type is a complex property and requires multiple names (comma separated).
- Minimum two (maximum three) names should be there - one for the file name and the other for the file data.
- If the name attribute contains two names, the file data is stored in the table itself.
- If there is a third name, then that is assumed to be a pointer (see format below) to an external storage where the data will be stored. Presently, local file and AWS S3 are supported - in future, support for other destinations may be added.
- When using external storage, Wizard app uses a default mechanism for storing the data as files on disk. The default mechanism can be overridden to change the folder structure or to store it on AWS S3. When overriding the default mechanism, you must use the 'beforesave' handler mechanism of customization and provide a custom target pointer.
- In validation (comma separated list), using 'image' implies that the attachment is an image.
- In validation, flagging 'document' implies that the attachment is a document. (PDF, DOCX, HTML or TXT). See 'Special Handling' for documents below.
'file' Location Pointer
The structure of the file location pointer is-
{Storage ID}:{File Path}
{Storage ID} can be 'local' or the name of a storage target configured for your ZOAPIIO instance. Using a storage location other than local, requires pre-configuration on the server. If you plan to use custom storage destinations in your app, please contact your administrator to create an AWS S3 (or any other supported type) on the server. Access to external targets requires credential configuration, which is a system administrator task.
'local' implies local file storage and does not require any pre-configuration on the server.
{File Path} looks like a regular file path - it must start with a '/', although it will be created under a folder on your Instance. It can contain names with characters that are acceptable as filename characters on Linux OS. It can contain '/' (slash) as path separators and finally you can include a placeholder string '${Id}' which is always substituted with the Id of the entity record.
When using external storage, no action is needed from your end if you want the files to be stored on disk as default folder structure. The default mechanism is sufficient for most cases. However, if you want to override it, you can do so through the 'beforesave' event handler for the entity.
'document' Special Handling
If a file type entity property is flagged as document (via validation attribute), the wizard automatically extracts the raw text from the document (PDF, HTML, TXT, or DOCX) and adds it as an additional column in the table. This new column name is created by appending 'Text' to the first name in the names list.
The raw text is also fully indexed, allowing you to search for entities using words appearing inside the documents. The text in this 'Text' column can be retrieved and used using the APIs like a normal entity property.
Filtering & Cascading
The visualization app will allow you to create, query and edit data. The form is automatically generated from the configuration you have provided. The form content and behavior can be tailored to some extent. For example, you can have conditional properties - let us say there is a selection field with 'Others' as an option. If this is selected, you may want to capture additional details. This can be implemented using the 'condition' attribute (See Reference Guide in the end).
Another situation that occurs sometimes is when a group of fields are related to each other and the selection cascades through them. For instance, in our example - for an Asset Category, there are Asset types, and for each Asset type, there are Asset Sub-types.
When entering/searching Asset details, Category, then Asset Type, and then Asset Sub-type will cascade. Meaning, when the Category is picked, the list of Asset Types will be shortened, and when the Asset Type is picked, the sub-type list is shortened.
This cascading can be achieved using the 'filter' attribute in entity property definition.
- The value of the filter can be a property name (like Category in our example) or an entity name (like assettype in our example).
- When using filtering on a selection field, use 'select:..' data type instead of 'easyselect:..' type.
- The name of the property should be the same in both entities participating in cascading.
- See the example at the top of this guide.
Workflow
entity records are workflow enabled. You need to declare the workflow definition with the entity. See Reference Guide at the end for details.
Widgets and Dashboards
Data visualization (or dashboards) is a primary use case of the applications. Almost all applications will have the requirement of a dashboard that displays key parameters requiring user attention. The dashboard is composed of a set of widgets laid out in any suitable layout.
Widgets,
- Are graphical or textual displays that concisely convey a relevant metric.
- In , must be programmed by you by specifying the data source and a display format. The programming, in most cases, can be simply an SQL query, the chart type, and specification of output values that are to be displayed in the chart. Internally, uses Google Charts for visualization.
- By themselves, are just definitions. They must be added to a dashboard by the user. The users can create multiple dashboards, each having multiple widgets and a layout.
- Can have parameters, which themselves can be static and dynamic. Static parameters are given values at the time of adding the widget to the dashboard. The dynamic parameters are displayed alongside the widget and the user can change them on the fly, while the widget is in view.
Widgets are defined under the Customization section of the Wizard configuration JSON.
Data Source
Data for the widgets can be sourced by directly specifying an SQL query, or by providing an API URL.
SQL is sufficient in most cases, but to meet any realistic real life requirement, it can become quite complex, requiring multiple Joins and nested Selects. Depending upon your skill level in SQL, you may want to take the help of a friend who is proficient. You should first develop and test your SQL Query in the DB Assistant tool (acccessible from the Designer) and then copy the finished SQL in the Widget configuration.
When using a Web Service as the data source, you must program the service in your project.
The Wizard generates the API wrapper in both cases which handles the data fetch from the Query or the custom API as appropriate. The Wizard also generates the Request and Response structure for the wrapper API.
The entire process is transparent in case of SQL source, but you need to be aware of these when building the API source. You can view the definitions of VAPP_vwidgetRQ and VAPP_vwidgetRS in the generated project.
- Under the Request there is a node qryp where the Filter/Selection parameters are sent (See Selection below). To Access the value of a Filter parameter, access it using path VAPP_vwidgetRQ/qryp{PARAM-NAME}/value. The curly braces should be typed as is.
- Your API needs to return the data in the same format that the Wizard has generated. A convenience method - VAPP_DATAWidget - is available in the generated project to help you map your data into that format.
- You must prepare your data row as a Node - the node should contain children for each column that is declared in your Wizard configuration (See result definition under widget output). The definition of result in configuration has a field by the name data, which refers to the of the element in the Widget output.
- The example below shows all components needed to create the API Source.
Wizard Config declaration
  "widgets": [
    {"name": "sample", "label": "Sample", "type": "PieChart
      "selection": [ ],
      "output": {
        "url": "/wc/widget-sample",
          "result": [
            {"name": "name", "label": "Name", "type": "string", "data": "@Name"},
            {"name": "value", "label": "Value", "type": "number", "data": "@Value"}
      }
    }
  ]
Web API
- Initialize the Response Node as the following XML -
<Row><Name>Joe</Name><Value>100</Value></Row> - Pass this row to the convenience method to populate the Widget response -
Call VAPP_DATAWidget Row /Response/VAPP_vwidgetRS. - Repeat for each row of data.
Widget Selection/Filters
The Widgets can be parameterized. For instance, a widget that displays the status of a sensor can take as input the Id of the sensor. On the dashboard, the users can create multiple instances of the widget with different parameters.
The Selection options are defined under selection in the widget configuration in the Wizard config file. Each selection parameter can be defined to be dynamic, which will make it a filter.
Filters are displayed alongside the widget and can be changed on-the-fly when the widget is displayed. For instance, when viewing the trends of some metric, the period can be dynamically selected - such as Last Week, Last Month, Last year etc.
- When using an SQL source you can embed the selection values in the SQL itself by prefixing
hash (#) to the name of the selection parameter. Note that when embedding the selection, it also
includes the SQL comparison operator. E.g. in query
Select ... from ... Where Name
			#SELPARAM
, there is no equals sign (=) after Name. - WHen using the API source, you can access the parameter value from the API Query object, as explained above in Data Source.
Widget Rendering
In most cases you will use one of the Built-in chart types for rendering the data. You do not have much to do, system manages it all automatically. It interprets the Widget data output and creates a Google Chart component and funnels the data into it.
As always, you may encounter a situation where the available chart types do not satisfy your requirements. allows you to provide a custom JavaScript class to handle the rendering. Refer to Front-End Customization for details and sample template for writing Widget renderers.
Pre-defined Widgets
Some pre-defined widgets are available, which you can use to create a customized homepage for your users (See Reference).
- #widget-workflow: Displays the workflow assignments of the user.
- #widget-personalize: Displays controls to personalize the app.
- #widget-profile: Displays the user's profile picture and allows editing of the profile.
- #widget-shortcuts: Displays all accessible entity types in a grid with a link to the entity's listing page.
- #widget-messages: Displays user's recent messages.
See Reference Guide for details.
Customization
Invariably, you would want the wizard generated application to have application specific business processing incorporated. You can provide custom code to modify the server as well as front-end application functionality.
Customization is meant for advanced users and requires knowledge of programming - primarily JavaScript. If you are not an experienced programmer yourself, you can perhaps approach a colleague to help you or get help from one of the several freelancing public services.
Each of the customization modules below require you to provide the program in a separate file from your local desktop. When you initiate the application generation, you will be prompted for all the files referenced here.
Backend
Wizard allows you to specify service-side hooks that can be called at the time of database operations on the entities. The Server-side code is developed using the WebIDE itself, and cannot be written using a standard editor.
When you add custom code to your project after it is generated, the changes will be erased at the time of the next generate. The Wizard provides a mechanism to deal with this situation - it lets you save the custom changes separately from the rest of the project and lets you incorporate it back with every generate.
- In your Wizard source file, declare a handler under "handlers" in the customization section. Give it a name and assign a file which has .webc extension. This file will be used to supply customization from outside.
- Identify the server-side hooks that you require and declare them against the entities as necessary.
- Proceed to create your project using the Wizard normally.
- After you click Continue below, on the next screen, Wizard will ask you for this handler file. Leave it blank at the time of first generation.
- After generating the project, proceed to add Web-APIs, Routines, methods, Data declarations, Database Queries, even Web applications to your project.
- Remember to include the Routines and Methods to handle the hooks declared in the wizard source.
- Then invoke the "File -> Save Customization" command from the menu - it will save only the customization that you have added, to a local file.
- Copy that file to the customization file that we named in the first step.
- Proceed with "Deploy" to deploy your project to the server.
- When you need to run the Wizard again, simply provide this file so that changes are automatically inserted into your project.
- The process described above can be repeated to build your application incrementally. That is-
- Generate the application and add existing customization snapshot (Possibly nil, the first time).
- Continue customizing and making more changes.
- Save the current state of customization in a local file and input it back in the next iteration.
Front-end.
The front-end customization in the Wizard generated project is used to add-
- Custom controls. Wizard supports a rich set of entity property types and you can add your own controls using this feature. Sometimes you need complex controls for editing multiple properties in a single control. That can also be achieved using this.
- Report renderer. The Wizard has report type entities, but the processing and rendering of the report must be provided by you. If you are using reports, you must provide this custom module.
- Child data editor. The Wizard creates a table-based editor for the child entities. However, sometimes the data in the child rows need to follow application specific constraints and require a custom editor which can edit the entire set in a custom UI. This feature can be used to create your own editor.
- Custom list renderer. The Wizard creates a table-based editor for the entity data. This implementation is very powerful and meets most needs. Wizard allows you to create a custom renderer for the data listing for the root (not-child) entities as well.
- Entity Actions. Custom actions can be added to each entity to implement business specific operations on the data records.
- Workflow Renderer. The workflow definition in your Wizard source file is rendered by the application using a generic UI, which is self-contained and sufficient for most cases. In case you require a customized control to render the Workflow, you can provide your own.
- Dynamic properties. Wizard expects that for each entity you will provide the properties and their details in the source itself. However, certain situations require that some properties and their details be determined only at run-time. The Wizard allows you to dynamically inject properties at run-time to an entity through customization.
- Dynamic dashboard widget. Wizard supports a wide range of Widgets for creating dashboards. You can create custom widgets using this feature and use them in your dashboards.
- Pages to the UI. You can add entirely custom pages to the UI as well.
You can club all your front-end customization in a single file, or keep it separated in multiple files. Declare each file under the customization section of the source JSON file. At the time of generation, you will be prompted for each file.
At the end of this guide, you will find the skeletal templates for each type of customizer. You can use these as starting points for your front-end code.
Incremental FE changes.
When you are building your application, typically you will be changing all parts (front-end and backend) in no specific order - based entirely on convenience. Whenever you make a change to the backend customization, you must regenerate the entire project because your changes are baked into the generated project.
The same is not true when making only the front-end changes. You do not need to regenerate the project and you can simply push the front-end JS files as an incremental change. To achieve this, select "Update Artifacts Only" to Yes above and click continue. You will be taken to the script load page, where you can choose to update all or some of the front-end scripts.
After updating the artifacts, you can stay on that page and click "Run Again" to push more changes without launching the Wizard from the beginning. When you are working on the front-end code, you need to make repeated deployments in a short time. This helps you achieve the deployment process efficiently and effectively.
Templates.
Custom Control Template ⮯ 👓
Report Renderer Template ⮯ 👓
Child data Editor Template ⮯ 👓
List Renderer Template ⮯ 👓
Action Handler Template ⮯ 👓
Workflow Renderer Template ⮯ 👓
Dynamic Properties Template ⮯ 👓
Dynamic Workflow Template ⮯ 👓
Custom Dashboard Widget Template ⮯ 👓
Custom Page Template ⮯ 👓
Help File Template ⮯ 👓
Interacting with UI/Server
Your JavaScript program can interact with the page (and server) by calling the following methods on the 'form' object, which is received in the constructor.
| Function | 'form' method | Description |
|---|---|---|
| Get the value of a field on the page | getProperty(fieldname) | Should also be called to get the initial value of the fields being rendered. |
| Execute an ajax query | getProperty([url, reqobj], 'query', [this.handler, this, parameter]) | The query URL can be one of the Wizard generated APIs, or a custom query provided by you.
|
| Get the list of entities from UI cache | getProperty(entityname, 'entity') |
|
| Get current user info | getProperty(null, 'login') |
|
| Get page environment | getProperty(envname, 'env') |
|
| Render a report as an interactive table | jQuery plug-in DataTable | When rendering a report as a table, you can use DataTable jQuery plug-in. It is loaded in the UI page. See documentation at datatables.net |
| Interact with UI page. | ||
App Properties
server provides you abstraction for Application properties. These properties are stored on the server in a database table and your programs can define and access them. You can update the Application property table directly using the DB Assistant tool. However, the Wizard allows you to populate these properties conveniently at generation time. The properties you define here are accessible to your custom server APIs as Properties abstraction. See the Web-API documentation for details.
| Property | Description | |
|---|---|---|
| name | A Unique name for the property. | |
| value | The value of the property. | |
| Application properties. | ||